In the digital world, where cyber threats are becoming increasingly complex and sophisticated, keeping your WordPress site secure is critical. Whether you run a personal blog, an e-commerce store, or a corporate website, protecting it from intruders, hackers, and malware should be your number one priority.
The statistics are disheartening: according to WordPress Stats, almost 70% of all websites built on this platform are attacked by cybercriminals. The consequences of these attacks can be catastrophic – from the theft of confidential data to the complete deletion of site content. In addition to financial losses, it can cause irreparable damage to your brand reputation and undermine customer confidence.
However, don’t despair, because there are effective ways to protect your WordPress site from potential threats. We’re going to look at the best practices and step-by-step instructions for improving the security of your website in 2024.
You will learn about the latest trends in cybersecurity, methods of protection against the most common types of attacks, such as brute force, injection, defacement, and much more. We’ll also look at the importance of choosing a reliable hosting service, setting up firewalls, installing updates, and performing regular backups.
Contents:
WordPress security step by step (no coding)
- Install a WordPress backup solution
- Install a reliable WordPress security plugin
- Enable a web application firewall (WAF)
- Create an SSL/HTTPS certificate for your WordPress site
WordPress security step by step (manual configuration)
- Change the default admin username
- Disable editing of WordPress files
- Disable execution of PHP files in WordPress directories
- Limit WordPress admin login attempts
- Add two-factor authentication (2FA)
- Change WordPress database prefix
- Password protection for WordPress admin page and login
- Disable indexing and directory browsing
- Disable XML-RPC in WordPress
- Automatically log out inactive users in WordPress
Recommendations and tips (everyone should read)
Install a WordPress backup solution
Regular backups of your WordPress site are critical to ensure the security and integrity of your data. In the event of a cyberattack, system failure, or accidental deletion of content, you can quickly restore your website from a backup copy, minimizing data loss and downtime.
There are both paid and free WordPress backup solutions, each with their own advantages and disadvantages. Some popular options include:
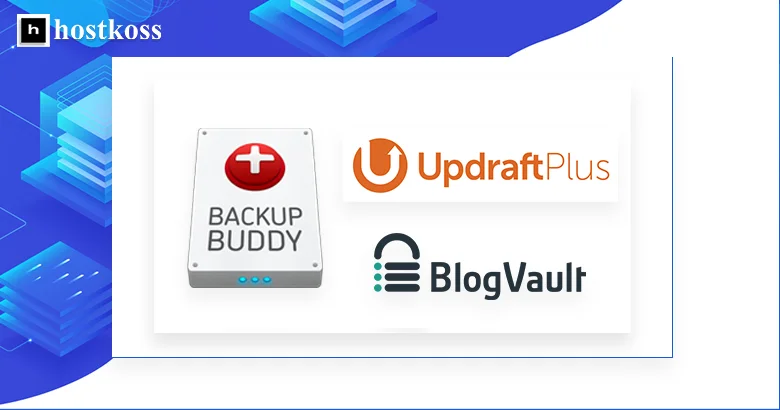
- UpdraftPlus – a powerful free plugin with the ability to backup your website, databases, plugins, and themes. It allows you to save copies to cloud services such as Dropbox, Google Drive, or Amazon S3.
- BackupBuddy is a premium solution from iBackup that offers reliable backup, data recovery, and website migration. It supports numerous storage options and process automation.
- BlogVault is a cloud-based backup service focused on WordPress security. It automatically creates daily backups and provides data encryption.
When choosing a backup solution, consider factors such as the frequency of backups, storage location (local or cloud), process automation, and ease of data recovery.
Pay attention to user reviews and technical support from the developer.
Install a reliable WordPress security plugin
One of the most effective ways to improve the security of your WordPress site is to use a specialized security plugin. These powerful tools offer a variety of security features, such as vulnerability scanning, brute force protection, blocking unwanted IP addresses, and much more.
Here are some of the top WordPress security plugins worth considering:
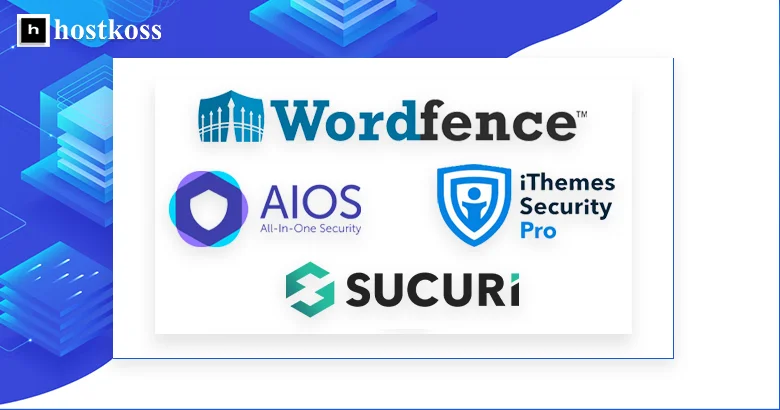
- Wordfence Security – One of the most popular security plugins with a built-in firewall, two-step authentication, and regular scanning for vulnerabilities and malware.
- Sucuri Security is a comprehensive solution that combines a web application firewall (WAF), vulnerability scanner, DDoS protection, and malware monitoring.
- All In One WP Security & Firewall is a free plugin with a wide range of features, including firewall, anti-spam, file monitoring, and blocking unwanted users.
- iThemes Security (formerly known as Better WP Security) – a powerful set of security tools with customizable settings, two-step authentication, and protection against malicious attacks.
When choosing a security plugin, pay attention to its functionality, ease of use, compatibility with your WordPress site, and regular updates from the developer.
Enable the web application firewall (WAF)
A Web Application Firewall (WAF) is a powerful tool for protecting your WordPress site from various types of attacks, such as malicious code injection, cross-site scripting (XSS), SQL injection, and many others. A WAF acts as a protective barrier between your site and malicious traffic, filtering out potentially dangerous requests.
There are both standalone WAF plugins for WordPress and complete security solutions that include WAF as one of the features. Here are some popular options:
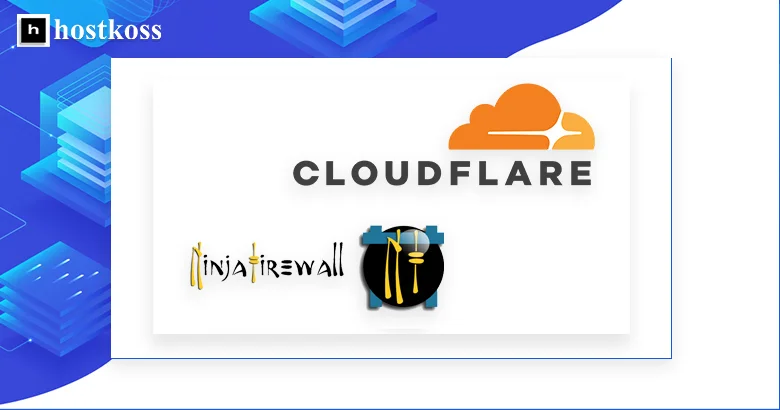
- NinjaFirewall (WP Edition) is a plugin that provides comprehensive WordPress security with a built-in WAF, malware scanner, and other security tools.
- CloudFlare is a popular CDN network that offers a free web application firewall option to filter unwanted traffic (I recommend it).
When choosing a WAF solution, pay attention to its performance, compatibility with WordPress, ease of setup, and technical support. It is also important to consider the ability to automatically update filtering rules to protect against the latest threats.
Create an SSL/HTTPS certificate for your WordPress site
Moving your WordPress site to the secure HTTPS protocol requires a valid SSL/TLS certificate. This digital certificate provides encryption of data transmitted between the user’s browser and your web server, protecting sensitive information from being intercepted by intruders.

There are several options for obtaining an SSL/TLS certificate for your WordPress site:
- Purchase a commercial SSL certificate: Companies like hostkoss offer paid SSL certificates with different levels of validation and validity periods. These certificates are fully trusted by most browsers and operating systems.
- Use a free SSL certificate from Let’s Encrypt: Let’s Encrypt is a non-profit organization that provides free SSL/TLS certificates with automatic renewal. Their certificates are only valid for 90 days, but are supported by all modern browsers.
- SSL/TLS certificate from the hosting provider: Many hosting companies offer SSL certificates as part of their hosting services. They can be either commercial or partner with Let’s Encrypt to provide free certificates. How to install Let’s Encrypt SSL in cPanel
Once you have your SSL certificate, you need to configure it properly for your WordPress site. Depending on the hosting and the type of certificate, you can do this manually through the control panel.
When setting up an SSL/HTTPS certificate, it is important to make sure that all pages, images, scripts, and other resources on your site load correctly over a secure connection. You should also update links to third-party resources and check the operation of caching, plugins, and other WordPress features after switching to HTTPS. How to use HTTPS redirects in cPanel
Change the default administrator username
Changing the default admin username in WordPress is a simple process that will greatly increase the security of your site.
Here’s a step-by-step guide on how to do it:
- Log in to the WordPress admin panel using the default admin account (admin).
- Go to the Users section in the side menu and select the All Users option.
- Find the user named “admin” in the list and click on their account to open their profile.
- On the user’s profile edit page, change the Username field to a new, unique, and difficult to guess name.
- After making changes, don’t forget to click the Update User button to save the new name.
I recommend using a long combination of upper and lower case letters, numbers, and special characters for the administrator username. This will make it as resistant to guessing as possible and protect your site from intruders.
It’s also important to remember to change passwords for other accounts associated with the old administrator name. This includes email accounts, hosting, and any other services that used the old name.
Disable editing of WordPress files
This feature allows you to edit the source code of theme and plugin files directly through the admin panel, which can be a potential risk.
By default, file editing is enabled in WordPress, but I recommend disabling it for security reasons. Unintentional changes to the code can lead to vulnerabilities or even a complete site failure. In addition, if your account is hacked, attackers will be able to modify files at their discretion.

Disabling file editing in WordPress is a simple process that takes only a few minutes:
- Log in to the WordPress admin panel as an administrator.
- Go to the Settings section and select the Editing option.
- Uncheck the “Allow file editing” option.
- Click the Save Changes button.
You can also add the code to your wp-config.php file
// Disallow file edit
define( 'DISALLOW_FILE_EDIT', true );
After completing these steps, you will no longer be able to edit the file code through the WordPress admin panel. This will greatly reduce the risk of accidental or malicious changes that could disrupt your site.
However, if you need to make changes to theme or plugin files from time to time, you can always do it through an FTP client or hosting file manager. This is a more secure way that gives you full control over the editing process.
Disabling the execution of PHP files in WordPress directories
One of the most effective methods of enhancing security is to disable the execution of PHP files in certain directories of your WordPress site.
This technology allows you to limit the ability to execute malicious PHP code in certain directories. Attackers may try to upload scripts to your server in order to gain unauthorized access and control over your website. However, if PHP execution is disabled for specific folders, such attempts will fail.
I recommend disabling PHP execution in the wp-content/uploads and wp-includes directories.
The process of disabling PHP execution is quite simple and consists of adding special code to the .htaccess file located in the root directory of your WordPress site. Learn more: What is a .htaccess file: main functions
Here are the lines you need to add:
<Files *.php>
deny from all
</Files>
This code tells the server not to execute any PHP files in the specified directory and its subdirectories. After making changes to .htaccess, even if attackers successfully download malicious PHP scripts, they will not be able to execute them.
Limiting login attempts to the WordPress admin
Limiting the number of login attempts to your WordPress site is an extremely important step to increase security and protect against malicious attacks.
One of the easiest methods is to use specialized security plugins such as Wordfence Security or Login LockDown. After installing and activating the plugin, you can configure the maximum number of failed login attempts allowed from a single IP address. Once this limit is exceeded, that IP address will be temporarily blocked.
In addition, these plugins often offer additional security features such as two-factor authentication or DDoS protection.
The next method is to make changes directly to your WordPress .htaccess file. By adding certain lines of code, you can limit the number of login attempts and customize the blocking time. For example, this code will allow only 5 failed attempts within 60 minutes from one IP address:
order allow,deny
allow from all
deny from unix

# White list localhost:

allow from 127.0.0.1

# Failed login attempts:

<Files wp-login.php>
order allow,deny
allow from all

# Allow no more than 5 login attempts from the same IP address every 60 minutes:

<limit-logins>
disable-env=off

# Delete the IP address when access is allowed or denied:

enable-env=allow-logins-env
env=allow-logins-env
maxretries=5
findrate=60
</limit-logins>
</Files>
Once this code has been added to the .htaccess file, you will need to restart the web server to apply the changes.
Also, some hosting providers offer a brute force attack protection feature at the server level, which allows you to block login attempts from suspicious IP addresses before they reach your website. Check with your hosting provider to see if this is available.
Add two-factor authentication (2FA)
Two-factor authentication requires users to go through two different steps when logging in – entering a username and password, and providing an additional one-time code or security token. This additional verification makes the login process much more secure, even if someone finds out your original credentials.
One of the most popular solutions for implementing 2FA in WordPress is the WP 2FA plugin – Two-factor authentication for WordPress. After installing and activating it, you will be able to enable two-factor authentication for any accounts on your site, including the admin account.
Setup process:

From now on, every time you log in to a WordPress site, in addition to entering your credentials, you will be required to provide a six-digit numeric code to verify the validity of the session. The code will change every 30-90 seconds.
It is worth remembering that after connecting 2FA, you need to save backup codes for emergency login in case you lose your smartphone with the authenticator application.
There are other plugins that allow you to set up two-factor authentication in WordPress, such as Duo Security and others. They can offer additional confirmation methods, such as SMS or phone calls.
Changing the WordPress database prefix
By default, WordPress uses the standard “wp_” prefix for all tables in the database. Attackers are very familiar with this prefix, which makes database attacks more predictable. By changing the prefix to a unique combination of characters, you will make it much more difficult for potential hackers.
Please note: changing the database prefix can lead to problems on your website if this process is done incorrectly.
The process of changing the database prefix in WordPress is quite simple, but requires caution as incorrect actions can lead to data loss.
Here are the step-by-step instructions:
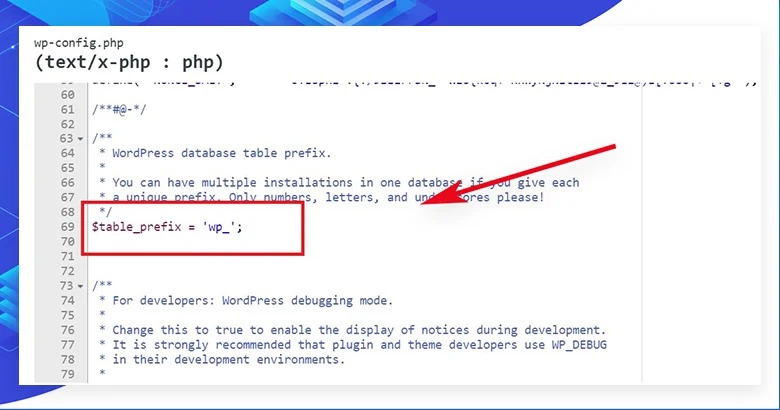
- Make a full backup of your database and all WordPress files. This will allow you to restore the site in case of problems.
- Edit the wp-config.php file by finding the line starting with $table_prefix = ‘wp_’;. Replace “wp_” with a unique combination of letters, numbers, and underscores of your choice. For example: $table_prefix = ‘my8ql_’;
- Using database administration tools (such as PhpMyAdmin), run an SQL query to change the prefixes of all existing WordPress tables to match the new value.
- Update the .htaccess files and any other files that may contain references to the old database prefix.
Here is a sample SQL query to change the prefix to “my8ql_”:
RENAME TABLE wp_users TO my8ql_users;
RENAME TABLE wp_usermeta TO my8ql_usermeta;

… repeat for all tables in your WordPress database
After completing these steps, your WordPress database will use a new, unique prefix. This will make the job of attackers much more difficult when trying to hack or inject into the database.
Note that changing the database prefix is an irreversible operation. If you plan to install updates or new WordPress plugins in the future, they may not work properly due to the unusual table prefix.
Password protection of the admin page and WordPress login
This step allows you to hide the wp-admin and wp-login.php page behind an additional layer of authentication, requiring users to enter a separate password before accessing these critical administration areas.
One of the easiest ways to implement this feature is to use cPanel.
Here’s how to do it:
Sign in to cPanel:
- Enter your cPanel address in your browser and log in with your credentials.
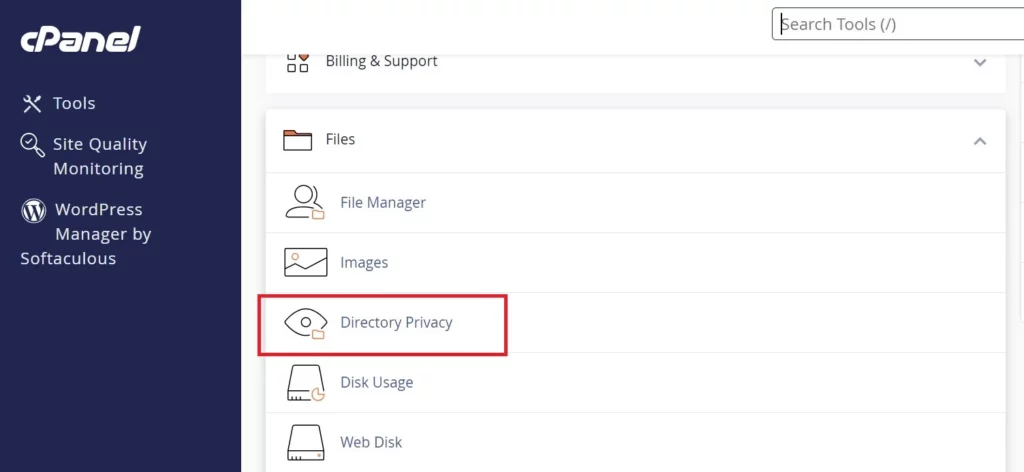
Open the “Password Protect Directories” page:
- Go to the Files section and select either Directory Password Protection or Directory Privacy.
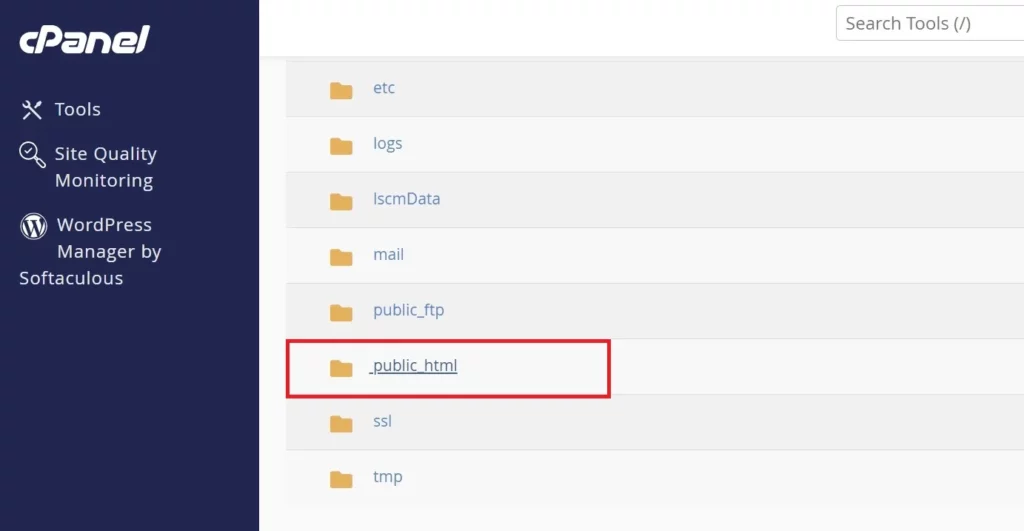
Locate the wp-admin directory:
- Select your site’s main directory (usually “public_html“) and locate the wp-admin folder.
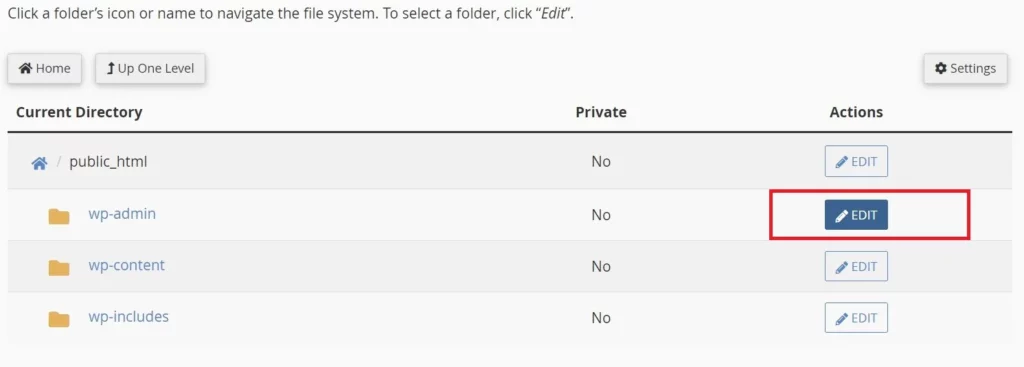
Password protection:
- Click on the name of the wp-admin folder.
- Check the box next to “Password protect this directory”.
- Enter the name of the protected directory (this name will be displayed to users).
- Click Save.
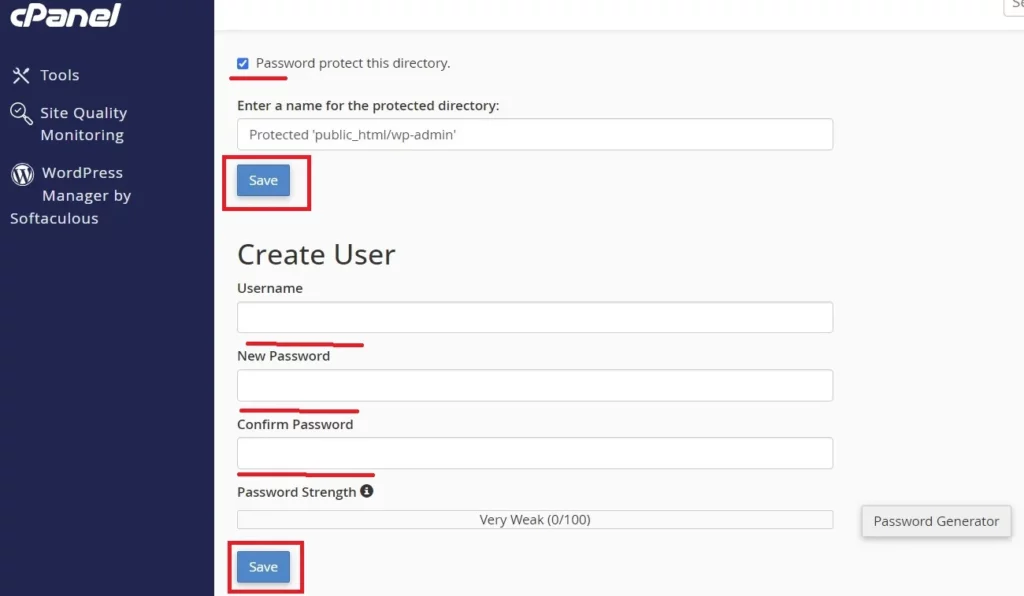
Create a user:
- Enter a username and password to access the protected directory.
- Click “Save” or “Add/Modify authorized user”.
After these settings, to access the wp-admin and wp-login.php pages, users will have to first enter a special security password on a separate authentication page. This will be an additional barrier for intruders and will help to secure your site’s administration panel.
Disable indexing and browsing of directories
This feature helps to hide the structure of files and folders on your server from third-party visitors and search engines. Thus, you will protect confidential information and keep your site from unauthorized access.
The process of disabling indexing and directory browsing is carried out by adding a few lines of code to the .htaccess file located in the root directory of your site. Here is a step-by-step guide:
- Step 1: Using an FTP client or your hosting file manager, locate the .htaccess file in the root directory of your website.
- Step 2: Open the .htaccess file for editing and add the following lines of code at the end of it:
Options -Indexes
IndexIgnore *
These lines tell the server to disable the indexing and browsing function of the folder. This means that the contents of your directories will be hidden from any visitors.
- Step 3 (optional): If you want to gain more control over the protection of directories, you can add another line of code:
Options -Indexes -FollowSymLinksThis code will also disable the ability to follow symbolic links on the server, which will increase security.
- Step 4: Save the changes in the .htaccess file.
After applying these changes, no one but authorized users will be able to view the structure of your website’s files and folders. This will help protect your website from hacking and unauthorized access.
Please note, however, that some plugins or services may require the indexing function to work properly. If this is the case, you can adapt the code in the .htaccess file by adding permissions for the corresponding directories.
Disabling XML-RPC in WordPress
XML-RPC (Remote Procedure Call) is a system that allows applications and services to interact with WordPress using XML requests. While this feature is useful for some purposes, it can also pose a potential security risk if not used properly. That’s why I recommend disabling XML-RPC in WordPress to increase the security of your site.
Disabling XML-RPC is quite simple and only requires a few lines of code to be added to the .htaccess file located in the root directory of your WordPress site.
Here is a step-by-step guide:
- Step 1: Using an FTP client or your hosting file manager, open the .htaccess file in your site’s root directory.
- Step 2: Add the following code to the end of the file:
# Disable XML-RPC

<Files xmlrpc.php>
Order Deny,Allow
Deny from all
</Files>
This code instructs the web server to block access to the xmlrpc.php file for all visitors, effectively disabling the XML-RPC system on your site.
Automatic logout of inactive users in WordPress
This feature helps to prevent unauthorized access to the admin panel through sessions left open.
By default, WordPress does not limit user session time, which creates a risk that attackers can use an unclosed session to gain access to the system. By implementing automatic logout after a certain period of inactivity, you will protect your site from such threats.
Setting up automatic logging out of inactive users is quite simple by adding a few lines of code to the wp-config.php file in the WordPress root directory.
Here is a step-by-step guide:
- Step 1: Using an FTP client or hosting file manager, open the wp-config.php file.
- Step 2: Add the following code at the beginning of the file, before the line containing “Thank you for not deleting this”:
// Automatic logout of inactive users after 30 minutes

define('AUTOSAVE_INTERVAL', 1800);
define('WP_SESSION_EXPIRATION', 1800);
This code sets the auto-save time for changes to 30 minutes, as well as the session duration to 30 minutes. After 30 minutes of inactivity, users will be automatically disconnected from the system.
If you want to change the inactivity period, adjust the value 1800 (in seconds) to suit your needs.
- Step 3: Save the changes in the wp-config.php file.
After that, WordPress will automatically close the sessions of users who have been inactive for a specified period of time. This will help prevent situations where someone can gain access to your admin panel through a session left open.
Managing the inactivity period will help you strike a balance between security and usability. Too short a duration can force users to constantly log in, while too long a period increases risks. 30 minutes is considered a reasonable compromise for most websites.
Recommendations from the hostkoss team
When it comes to the security of a WordPress website, you need to be careful and take a balanced approach to installing plugins. An excessive load on the hosting plan can negatively affect the performance of the site and cause problems with its availability.
We emphasize that you should not install all available security plugins at once. Instead, it is better to carefully analyze your current needs and choose only the most necessary tools that will meet the chosen hosting plan and its resource limitations.
For WordPress sites hosted on budget hosting plans with limited resources, it is recommended that you start with basic security measures, such as changing the database prefix, using strong passwords, setting up automatic logouts for inactive users, and installing a minimum of security plugins. As the resource needs of the site grow, you can gradually add additional security tools.
For project owners with high security and performance requirements, we recommend purchasing a specialized WordPress hosting with powerful resources. Such tariff plans will allow you to implement comprehensive security measures without the risk of server overload.
We also recommend that you check out our other articles for additional tips and instructions. Links to them are attached below:
- Access to the WordPress dashboard
- What is FTP? Advantages and disadvantages
- What are log files, how to manage them
- How to create a WordPress site in 2024
- What is a web host? How it works
- What is a data center?
- What is a landing page and how to create it
- HTTP status codes: What do they mean
- What is WordPress
If you have any questions or problems while setting up your site’s security, don’t hesitate to contact our support team via live chat or create support tickets. We are always happy to help and ensure that your WordPress site is secure and stable.
This article has been reviewed by Andrii Kostashchuk.
Questions and answers about WordPress security
Regular updates provide protection against discovered vulnerabilities and fixes for code bugs. Outdated versions of WordPress, themes, or plugins may contain vulnerabilities known to attackers, leaving your site susceptible to attacks and hacks.
To protect the admin panel, it is recommended to change the default administrator username, use strong and unique passwords, configure two-factor authentication, set password protection for the login and administration pages, and limit the number of login attempts.
Disabling unused functions, such as editing files in the admin panel, executing PHP in separate directories, or XML-RPC, reduces potential attack vectors and reduces the risk of vulnerability exploitation.
A brute-force attack is a method of guessing credentials by trying different combinations of usernames and passwords. To protect against it, it is recommended to set a limit on the number of login attempts, use complex and unique passwords, and set up two-factor authentication.
Regular scanning helps to identify potential threats such as malware, hacked scripts, or known vulnerabilities in the code. This allows you to take the necessary measures to fix the detected problems in a timely manner and improve the overall security of your WordPress site.