cPanel may seem intimidating at first glance, but it’s much easier to use than it looks. It is not the only hosting control panel you will come across, but it is the most popular. Therefore, it’s a good idea to understand how it works, and that’s what this article is dedicated to.
In this guide, you’ll learn how to get started with cPanel, install a WordPress site, set up professional email, add account security, and more.
There is a lot you can do with cPanel, and by the end of this tutorial, you should be well on your way to becoming a cPanel pro.
It should take you about 15-30 minutes to complete all the necessary steps in this tutorial. I followed these steps using the MINI-2 plan from hostkoss, as it offers a really low hosting price with lots of unlimited features.
Getting started with cPanel
Once you have registered with a web host with cPanel, to start using cPanel, you need to log in, choose a design and learn how to navigate the interface. It is also not unreasonable to change your cPanel password. In this section, I’ll walk you through each of these steps.
A word of warning: some of the cPanel features you’ll find on the home page may differ depending on the hoster you use. For example, your hoster may disable the cPanel backup tool in order to offer their own backup product as an add-on. But the general layout of cPanel is the same across different hosters, with many features organized into different categories.
To use cPanel, you need to sign up with the hosting provider that offers it, you can simply sign up with hostkoss.com/en/.
How do I log in to cPanel?
There are two ways to log in to cPanel, and both are fairly simple.
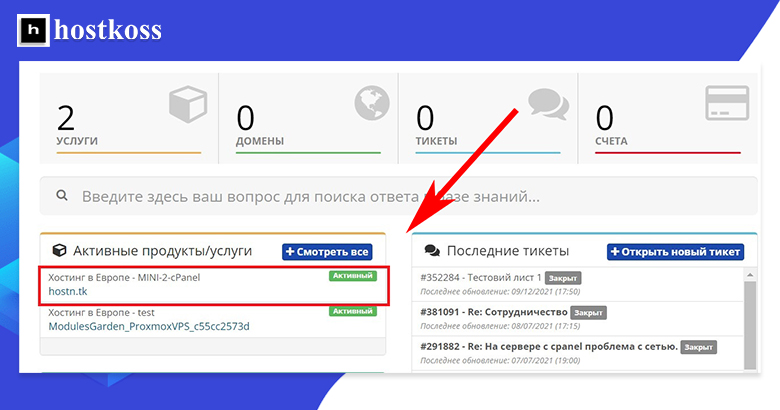
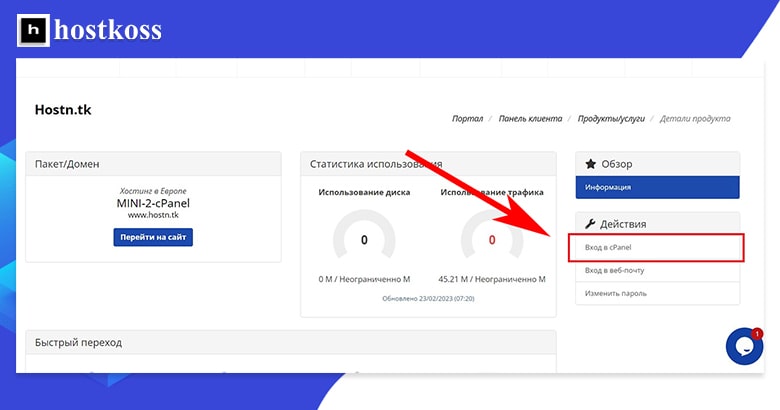
The first way is to use the login link or button that your hoster provides. Hostkoss.com, has a login button on their hosting account page.
The second way to log in is directly through cPanel by typing http://server.domain.com:2082 (for http) or https://server.domain.com:2083 (for https) into the browser address bar.
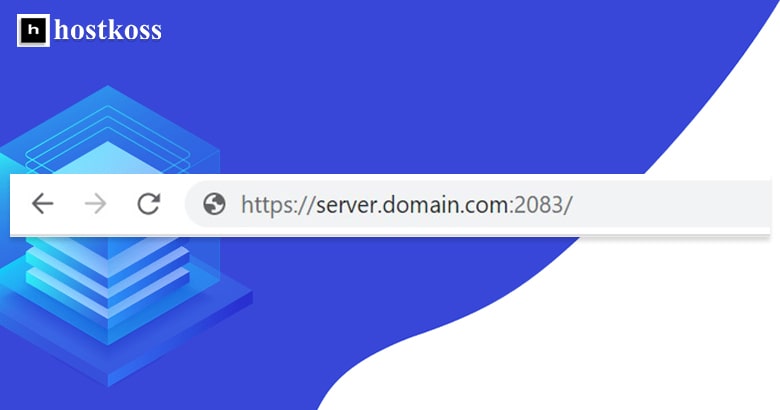
When you use the :2082 or :2083 method, you will be taken to the cPanel login page where you will be asked for a username and password.
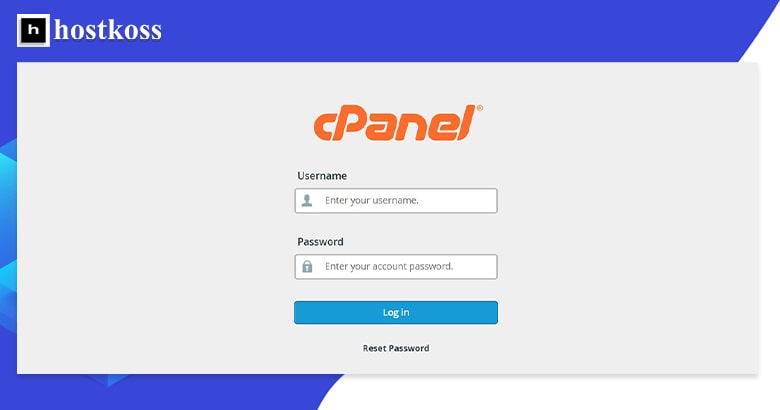
The login information for cPanel usually comes in the welcome email from your hoster. If it doesn’t, you can contact your hoster’s support team to get it.
How do I change the design of cPanel?
When you first login to cPanel, you will be presented with the default design offered by the hoster of your choice. If you don’t like the look of it, you can easily change the theme, and depending on the theme you choose, you can change the style as well. The available themes and styles may vary from hoster to hoster.
Pro tip: as of this writing, cPanel reports that it is in the process of removing its widely used Paper Lantern theme and all associated styles, including Glass. Therefore, cPanel recommends using the new Jupiter theme. In this article, that is exactly what I will do.
When you change the style of your cPanel theme, that layout is customized to your liking. It’s like changing the color of your house, putting on a new roof, or adding window shutters. The cPanel styles can include lists and icons, light and dark backgrounds, and more.
You can change the theme using the theme drop-down list on the right sidebar.
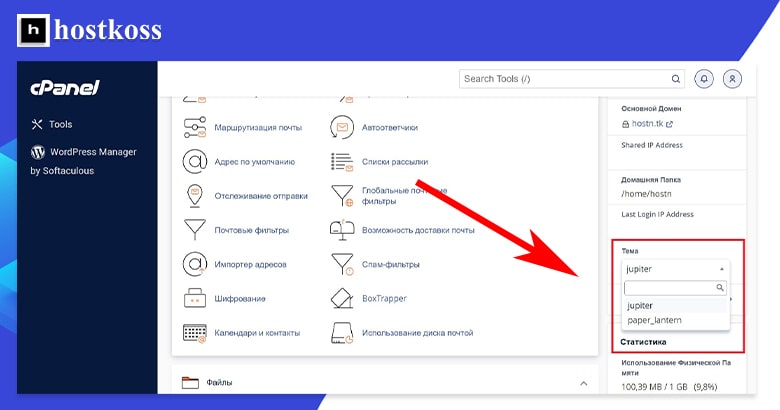
You will find all available themes in the “Themes” drop-down list
How do I change my password?
For security reasons, it is wise to change your password immediately after logging into cPanel for the first time. This can be done in two ways.
The first way to change the password is through the “Settings” category.
The second way to change the password is to open the user drop-down list and select “Password and Security”.
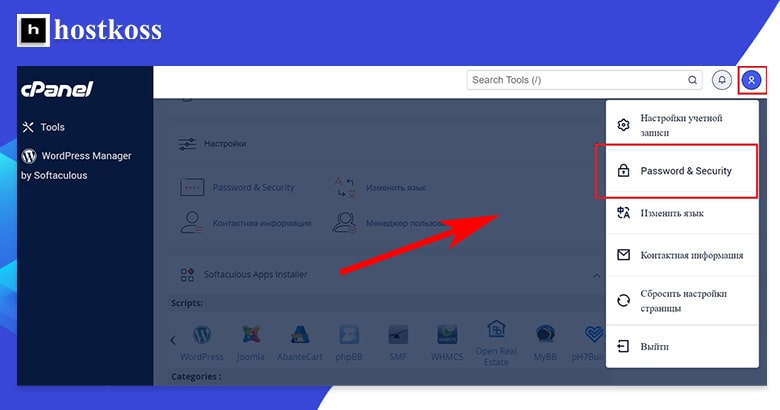
cPanel makes it easy to change your password in a drop-down menu
Regardless of which method you use, after clicking the Password and Security button, you will be taken to a form to create a new password. You will need to enter the old password, the new password and the new password again – a second time to confirm that it is correct. The form will also show the strength of your new password: from very weak (0) to very strong (100).
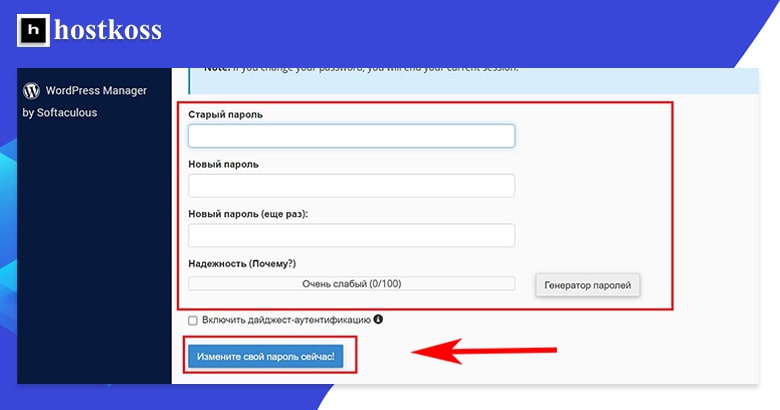
The password generator creates some weird passwords, so be sure to write them down.
Once you have entered the old and new password and verified that the new password is strong, click on Change your password now! and it will be updated.
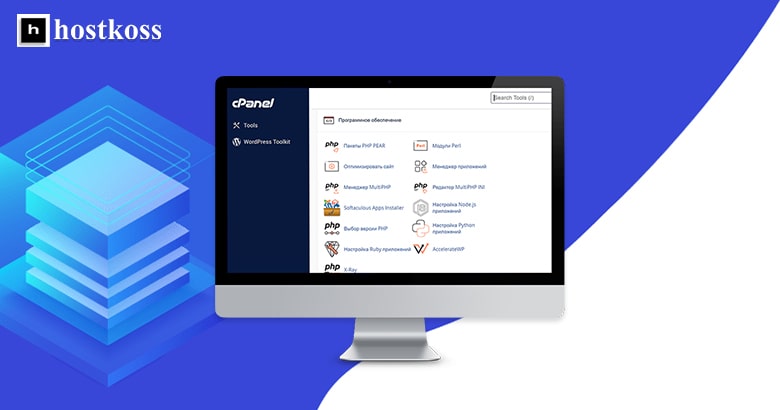
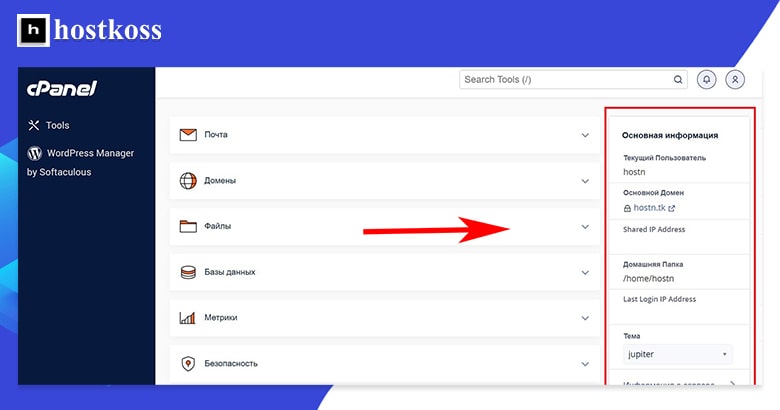
The cPanel interface is dominated by the feature categories, but it has a number of other components that you’ll want to familiarize yourself with.
Let’s take a look at each component of the cPanel Jupiter theme’s home page in a little more detail.
On the left side of the page, you’ll find the navigation bar. The options in the left navigation bar take you to the various pages of the cPanel interface. The left navigation gives you two pages, Tools and WordPress Manager.
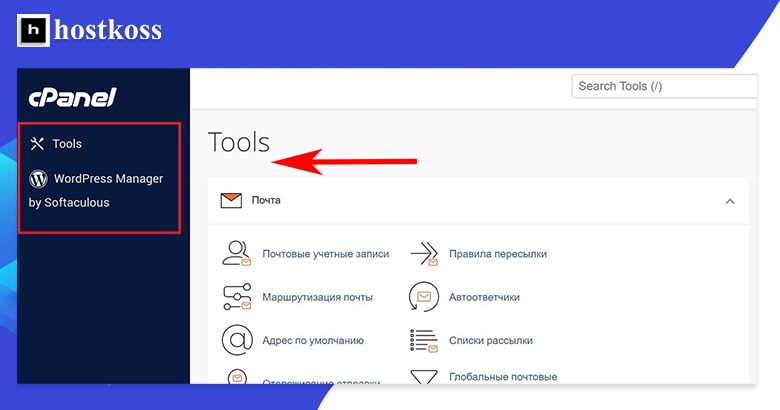
The left navigation bar of the cPanel takes you from one page to another
(Tools) Tools is the main page with all the categories and features. Solutions leads to the help page, which includes everything from guides on how to set up email and build a website.
The last page on the left navigation bar is the WordPress Manager. If you want to learn more about WordPress Manager, skip to the WordPress Installation section below.
Most of the Tools page is made up of different categories. These categories contain the different features of the cPanel – what you will use most often.
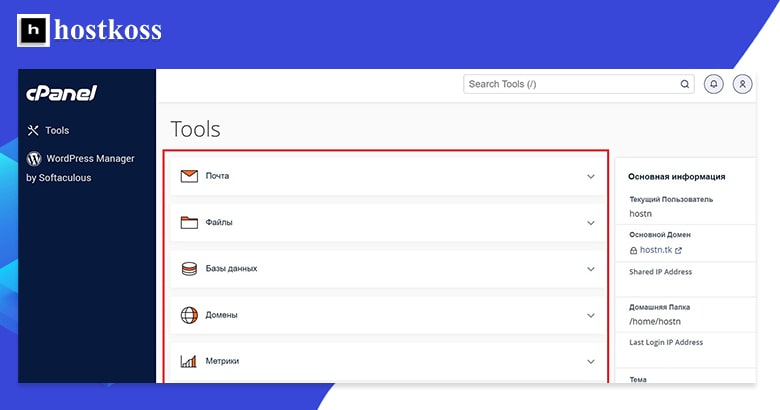
The cPanel uses simple and clear category names
The old cPanel themes used an icon-filled interface, which made it a bit difficult to learn and find the features you needed. Now, cPanel uses a text-based design, which you’ll probably find more user-friendly.
In the standard Jupiter theme view, each category is expanded so you can see its features. In the image above, I’ve collapsed them so you can see more of the categories themselves. If you want to see the features within a category, just expand the category by clicking on the dropdown arrow on the right.
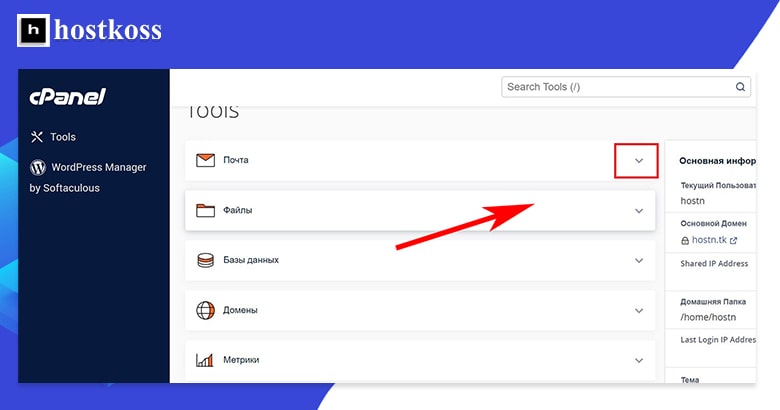
If you, like me, don’t like clutter, it’s nice that you can expand or collapse categories.
You won’t need all the features of cPanel, so you can easily rearrange the order of categories to put the ones you use most often at the top. Reordering is done by simple drag and drop.
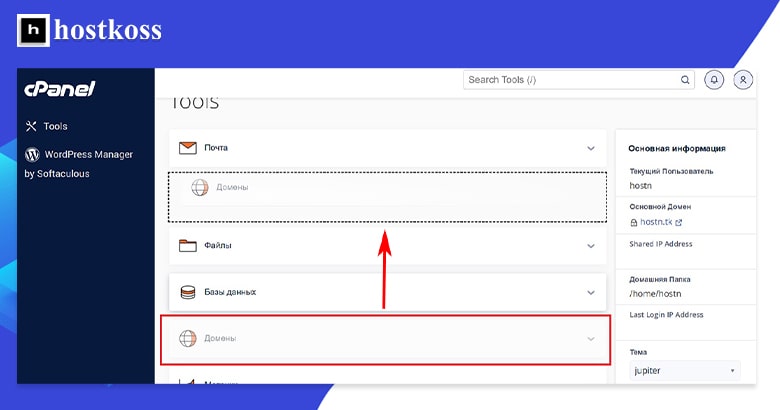
When you move a category, wait for the dotted line to appear and then move it into place
You can use the search bar at the top right of the page to find anything specific in cPanel. The catch is that you need to know what you are looking for.
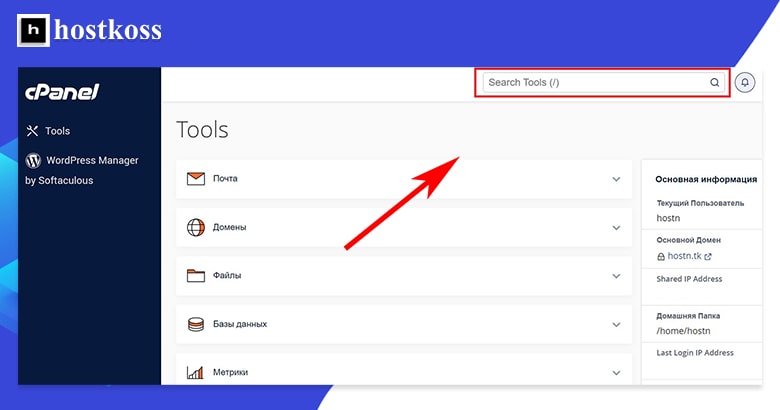
As you type, the search bar displays all the cPanel items relevant to your search
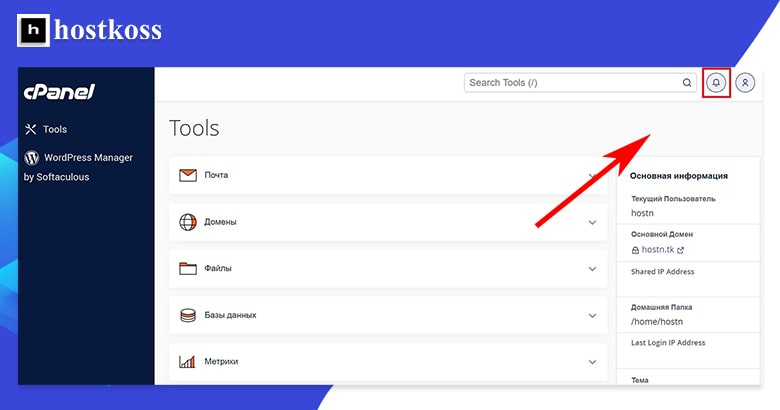
The notifications element will take you to the page with notifications received. This is indicated by a small bell in the upper right corner of the page.
On the right side of the page is the right sidebar. The right sidebar contains general information about you and your domain, as well as detailed statistics about your hosting usage, including disk space, bandwidth, number of email accounts, and more.
Don’t worry if you don’t have a complete idea of how to access everything at once. The cPanel interface is usually easier to understand and memorize once you start using it. In most cases, you’ll want to start by adding a domain, which you can do by following the instructions below.
Before you continue, you may want to sign up for MINI-2 standard hosting hostkoss.com, as that is what I used to create this guide.
Adding domains and subdomains in cPanel
Creating a new domain or subdomain allows you to launch a new site or a separate subsection of an existing site. cPanel makes it easy to do this – read on to find out how!
Adding a domain
To add a new domain in cPanel, start by selecting Domains in the Domains category.
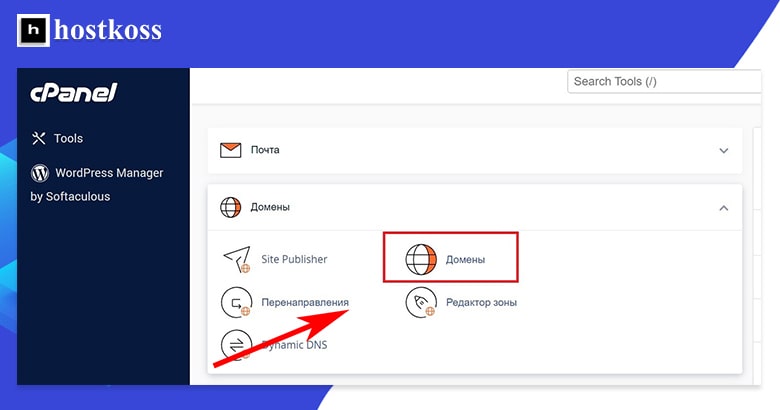
Domains is located at the very top of the Domains category
Clicking on Domains will take you to the domain management interface. This shows all current domains, options for each of them, and the Create New Domain button.
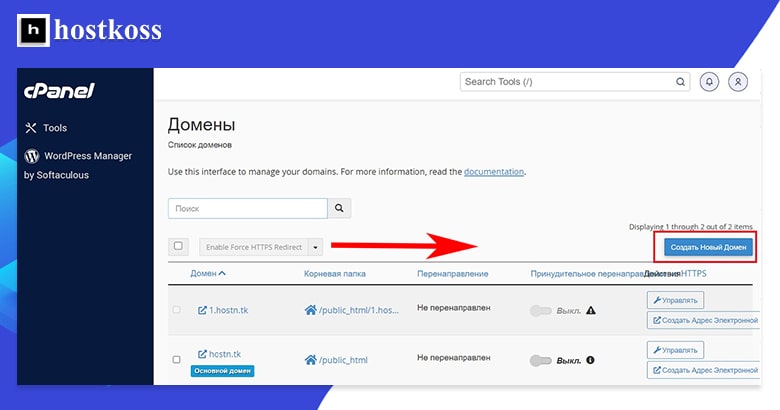
You can easily create a new domain on the domain list page
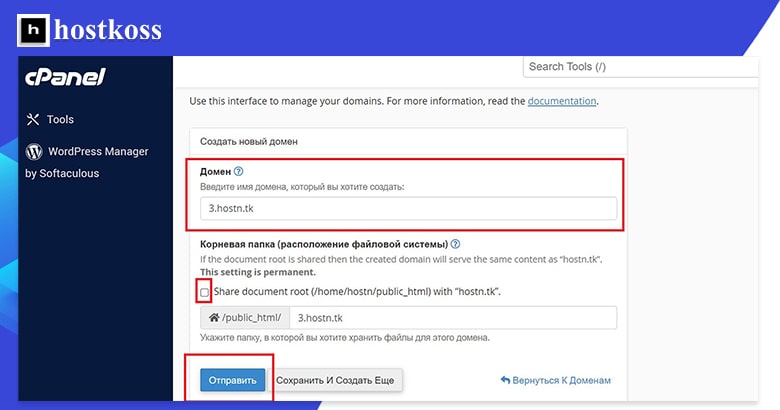
After clicking Create A New Domain, you will be taken to a page where you can enter a new domain name. If you want your new domain to take users to the same site as your main domain, make sure the Document Root box is checked. If you want the new domain to be separate from your main domain, uncheck the Document Root box.
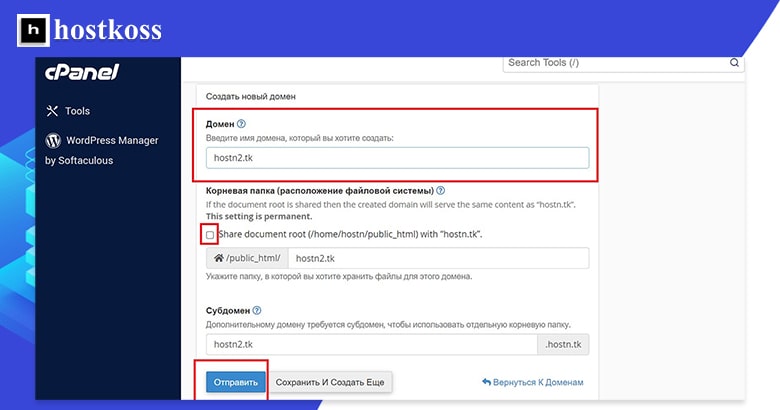
cPanel allows you to quickly and easily create new domain names
For the example above, I created the domain “hostn2.tk” and did not check the Document Root checkbox.
You can create as many domains as your hosting plan allows and root them to your main domain.
Adding a subdomain
Adding a subdomain in cPanel is very similar to creating a new domain. The first step is to open the Domains category, select Domains. Here you can add a new subdomain.
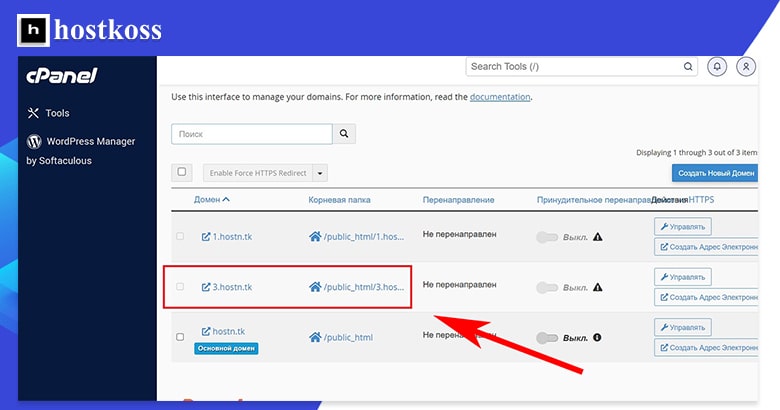
For my test site I created a subdomain “3. hostn.tk “.
A subdomain is useful if you want to create a completely separate new section under the same domain name. Subdomains are great for blogs, help sections or, if you have an online store, for creating categories for your store, such as adults, kids, shirts, pants, sweaters and so on. You can even install a completely separate instance of WordPress under a new subdomain if your web host allows it.
For my test site, I created the subdomain “3. hostn.tk “.
After a few seconds, you will receive a confirmation that your subdomain was successfully created.
After creating the subdomain you can go back to the domain management page and see the new subdomain in the list of domains.
Once your domain is set up and associated with a domain name, you can get to work creating a website in that space. While you can create and upload a static HTML website and install various types of content management systems (CMS), most people prefer to use WordPress because it is usually the easiest and most flexible option.
In addition, many hosting providers have web servers configured specifically to run WordPress, even in the cheapest plans.
Installing WordPress in cPanel
Most web hosts have an automatic installer program to help you easily install WordPress (or other software). hostkoss uses Softaculous. The way to access the auto-installer may vary from host to host.
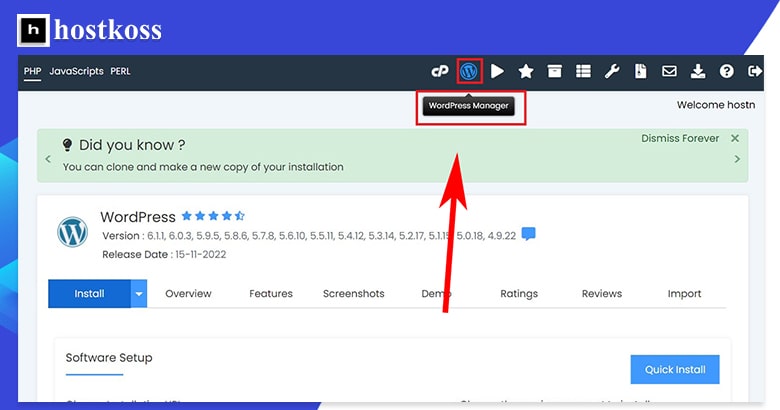
The first way to start installing WordPress is to go to the WordPress Manager through the left navigation bar.
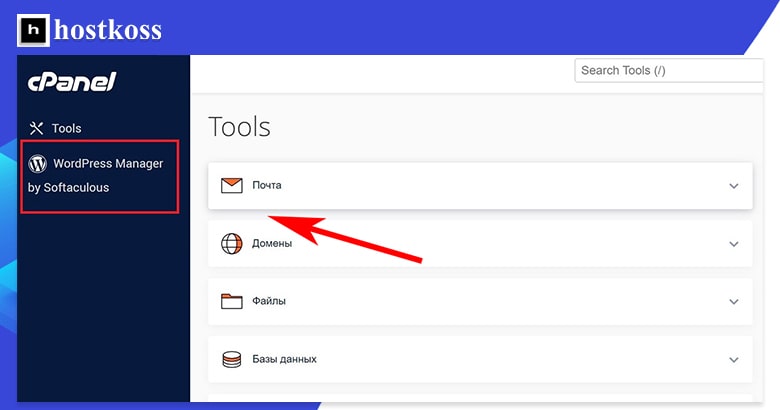
The fastest way to access WordPress Manager is from the left navigation bar
The second way to start installing WordPress is to select WordPress Manager in the Software category of the Tools page.
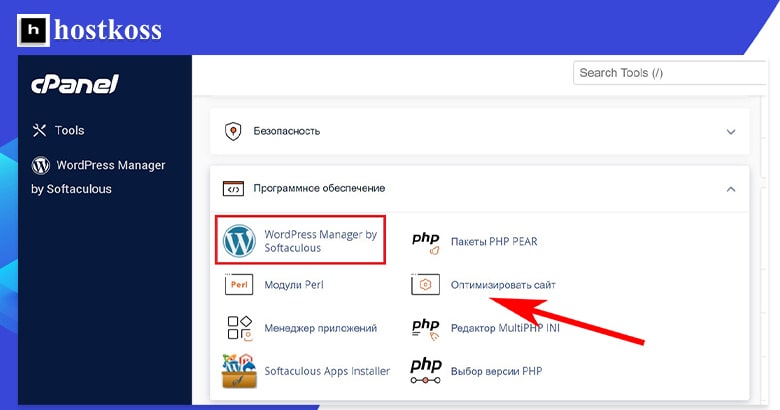
It only takes one extra click to get to the WordPress manager via the “Software” category
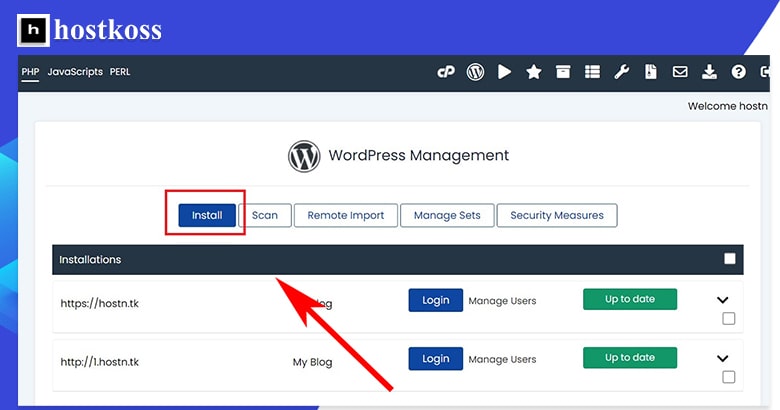
If you choose to install WordPress through the first or second option, you’ll be taken to a handy Softaculous WordPress Management page and you just need to click Install.
The third and final way to start installing WordPress is to access WordPress through the Softaculous Apps Installer category. This is also where you will go to install other software.

cPanel Softaculous Apps Installer
Clicking on the WordPress icon in the installer will open a version of the Softaculous installer with lots of options, which can be confusing at first glance. But at the bottom of the page, there’s an Install Now button that requires just one click to start the installation.
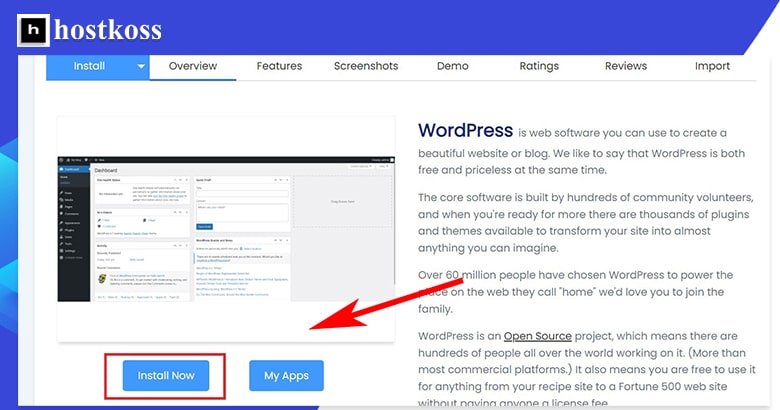
cPanel Softaculous Apps Installer Install Now
Regardless of how you access the WordPress manager, you’ll end up on the setup page with an Install button. This is where you will connect your domain to your WordPress site.
If you only have one domain, Softaculous will connect it automatically. If you have multiple domains, you will need to select the URL of the domain where you want to install WordPress and then click Install.
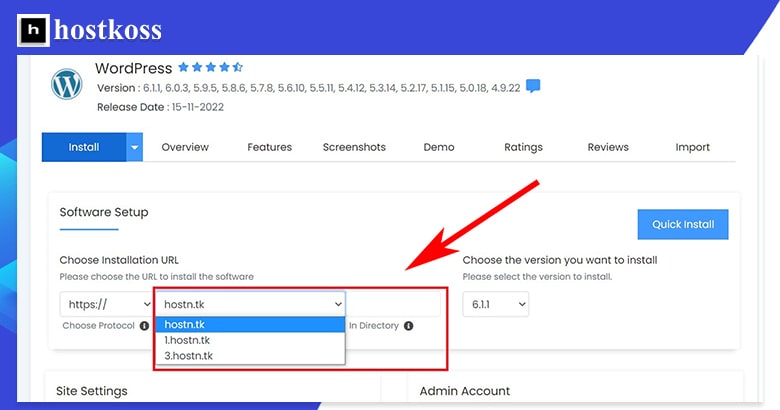
Make sure you double check your URL before clicking the install button

Press the Install button.
Tip: unless you have a good reason to change it, keep the URL protocol as https:// to keep your site secure. And keep the default WordPress installation version – this is the latest version your hoster supports and will be the most up-to-date.
The WordPress installation process can take three to four minutes, and you’ll see a status bar informing you of the progress of the installation.
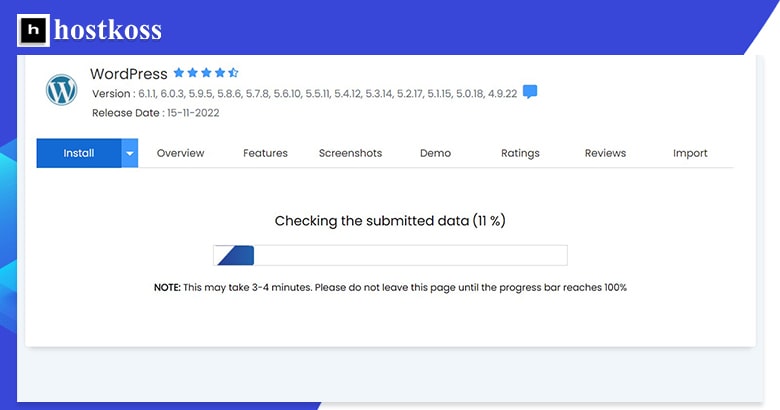
The only way to see real progress is to check the percentage of data submitted.
When the installation is complete, you will receive a confirmation of completion.
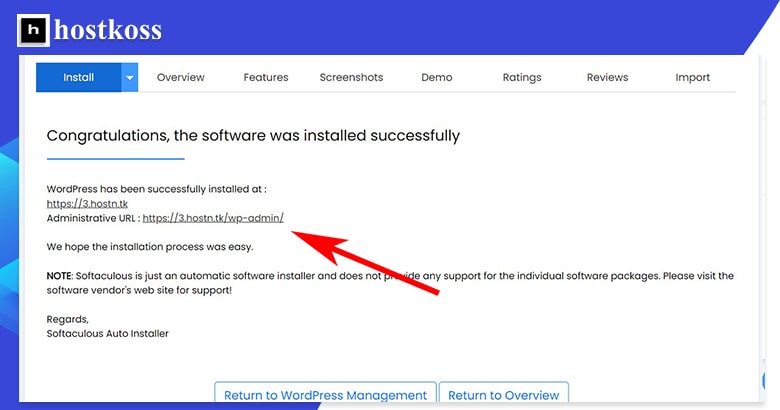
The installation confirmation is generic, but also confirms your URL
To manage your WordPress installations, access the WordPress admin page through the WordPress Manager in the left navigation bar or through the WordPress Manager function in the Software category.
Softaculous WordPress Manager is easy to use
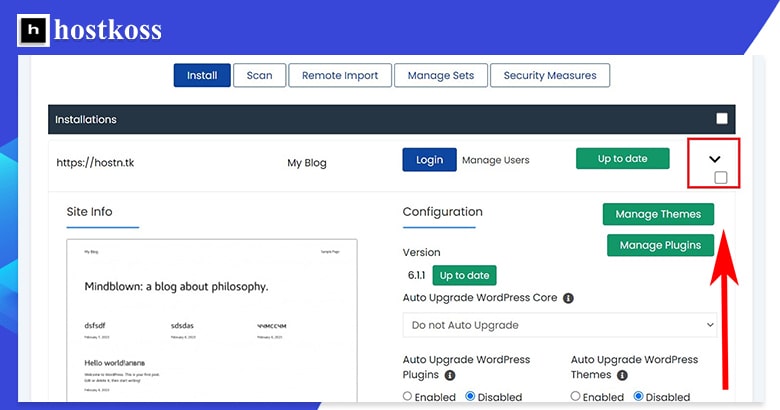
Your admin page will now allow you to manage the themes and plugins you’ve installed, as well as enable automatic updates, allow or disallow search engine visibility, and more.
Setting up e-mail in cPanel
Regardless of what email options your host offers, the process of creating and managing an email account is pretty much the same from host to host.
How do I create an email address in cPanel?
Creating an email address in cPanel takes only a few steps. Start by selecting Email Accounts in the Email category.
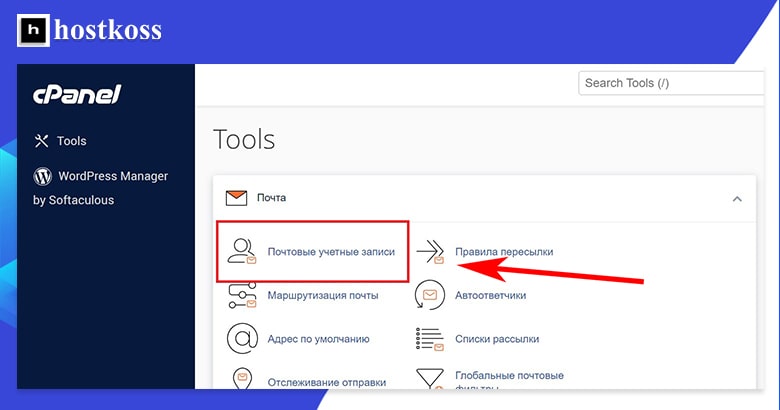
Email is one of the first features you’ll find in the cPanel interface.
You will be taken to the Email Accounts page, which is the center for all the email accounts you have created. You can create a new email account by clicking the Create button on the right.
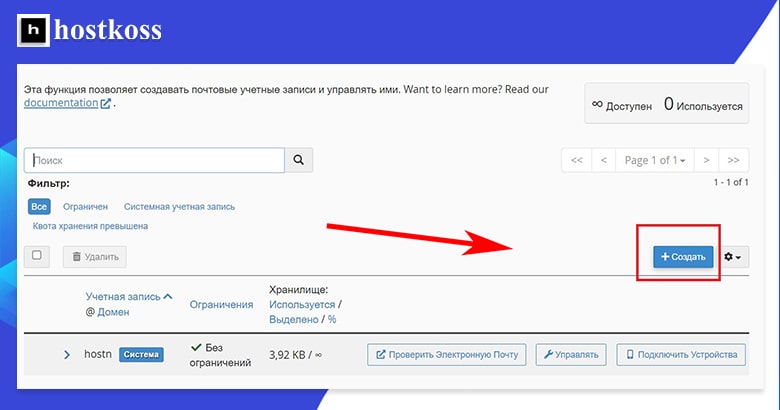
cPanel makes it easy to create new email accounts with a single click.
After you click the Create button, you will need to fill out an email account creation form. Here you will come up with a username, decide on the domain you want to link the name to, and create a password for the email account.
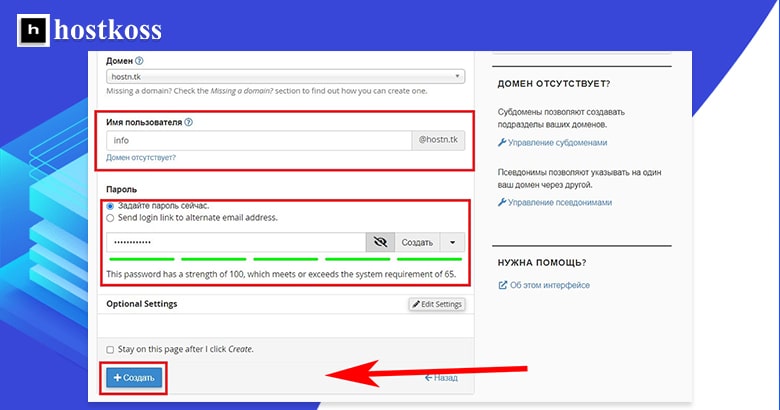
Make sure you select the correct domain and create a strong password
Once you’ve done all of this, clicking the Create button on the form will create your email account.
You will be redirected to the Email Accounts page. You will now be able to see how many of your allocated email accounts you have used, as well as manage all the email accounts you have created.
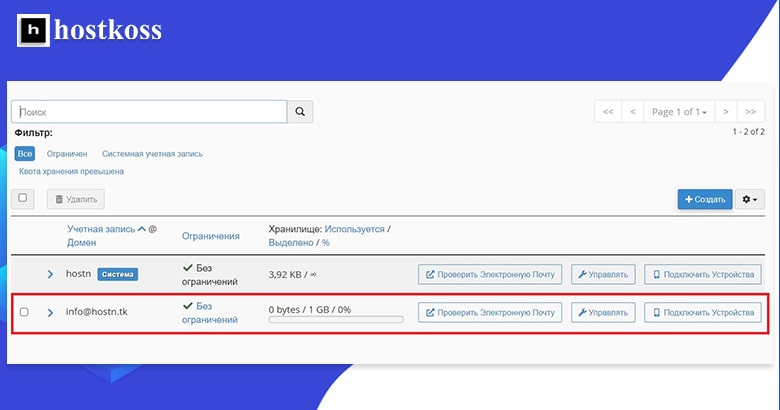
Keeping track of your email accounts is pretty easy with cPanel
How do I set up my email?
There are two ways to set up email in cPanel. Both ways start by accessing the Email Accounts page under the Email category.
The most direct way to configure email is to click on Manage for the account you want to configure.
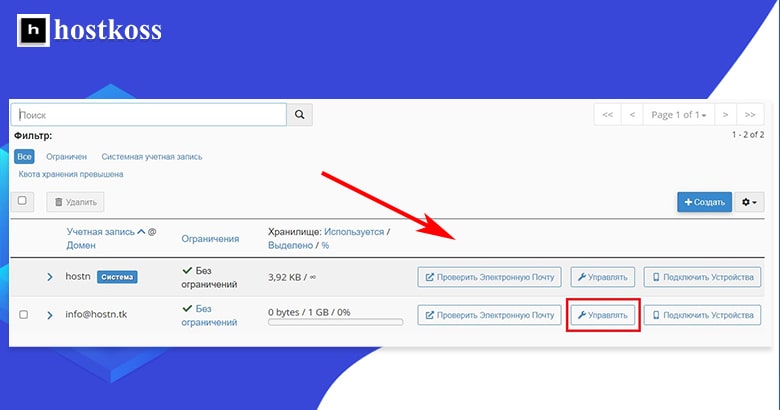
With cPanel, you can manage one email account at a time
Unfortunately, you cannot set up multiple email accounts at the same time, so if you create many accounts, it can take some time to set up.
There are default email account settings in cPanel, but you can configure each individual account as you see fit. You can customize storage capacity, create automatic replies, customize calendars and contacts, create spam filters, and more.
You will find all the settings on the “Manage your email account” page.
Some settings, such as storage limits and spam filters, depend on your hoster.
The second way to customize your email is to access your account via Check Email.
By setting up your email account this way, you get a different view, but basically the same customization options. This view is more user-friendly, but you can’t customize things like storage limits here.
How do I access my email from cPanel?
Accessing and checking email from cPanel is easy: just click Check Email on the Email Accounts page.
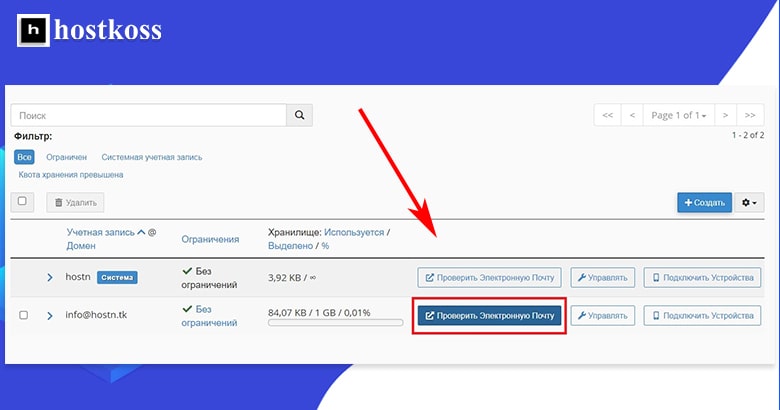
This is a less obvious way to access your email configuration settings
The first time you access email, you will need to decide which webmail client to use. The default is Roundcube, but you can use a different client if there are others available.
For the purposes of this tutorial, I used Roundcube. I also checked the box to automatically open my inbox every time I log in. The last part of the setup is to click the Open button.
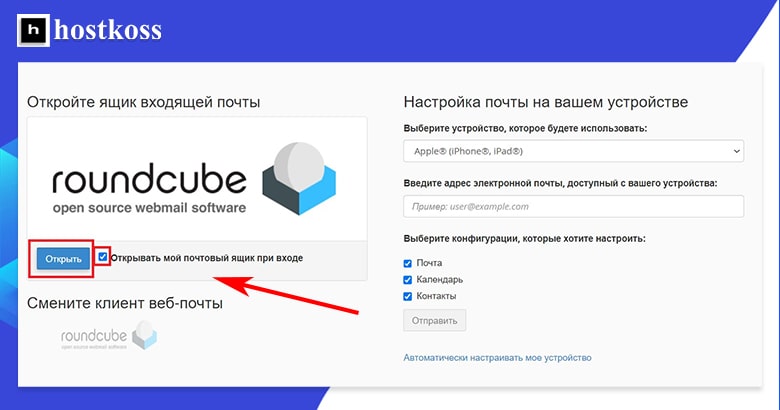
I highly recommend that you automatically open your inbox when you log in
The appearance of your inbox may vary depending on your webmail client.
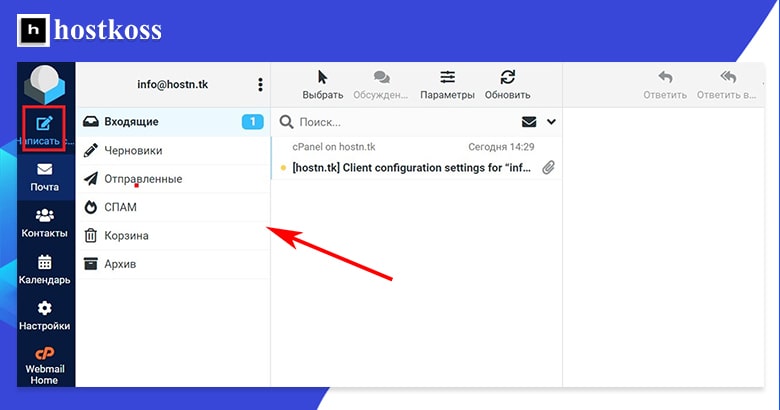
Roundcube’s standard inbox design is very user-friendly
If you’re like me and want to make sure everything is working correctly again, you can send a test email from your personal (Gmail or other) email account.
Tip: You can change your email settings from your inbox by clicking on “Home Webmail” which is at the bottom of the left navigation bar.
You should be done at this point, but if you want to customize security settings, manage files, or work with your WordPress database, there are guides to three additional steps below.
If your current host doesn’t offer email, hostkoss will migrate your site for free, even with the cheapest plan.
Improving site security with cPanel
Enabling security features is very important to protect your website from malicious attacks. Some web hosts offer free security features in their entry-level plans, but often you’ll have to add security yourself.
You can use free plugins such as Sucuri’s all-in-one security option, but there are also several things you can do right from cPanel to improve your site’s security. These include backing up your site, password-protecting certain directories on your site, and blocking traffic from certain IP addresses.
How do I back up websites?
Backing up your site will allow you to restore your data with minimal site downtime in the event of an attack. Some web hosts automatically back up your site, but not all.
If you have chosen a hosting service that does not provide backups, you can enable backups using the cPanel Backup Wizard. The backup wizard is available in the Files category.
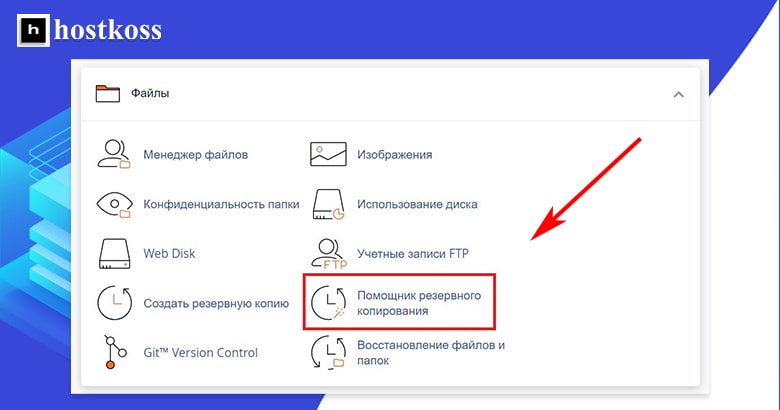
Backup Wizard is a convenient way to create a copy of your website with just a few clicks of the mouse
With the Backup Wizard, you can make full or partial backups of your home directory, MySQL databases, mail forwarder configuration, and mail filter configuration.
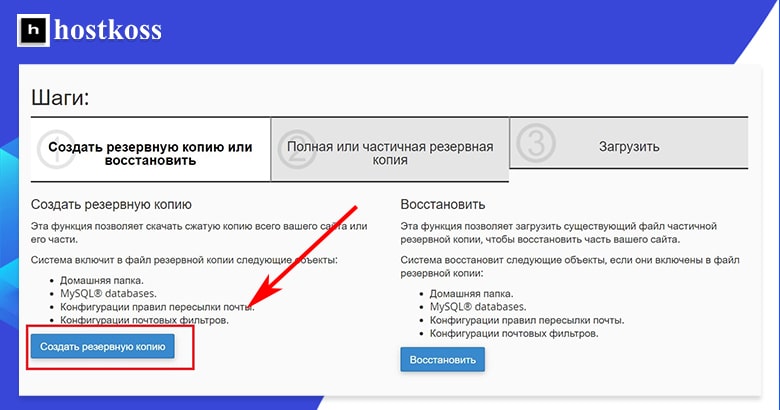
You can back up or restore files from the first page of the backup wizard
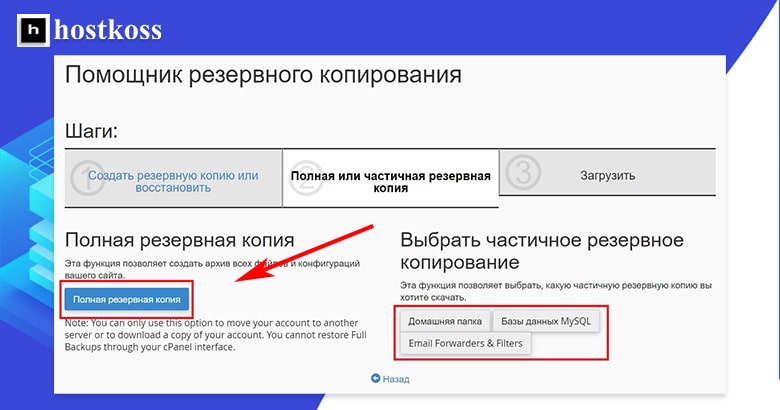
I like that cPanel allows you to backup only part of your site if you want to
Once you have selected the site items to back up, you need to select the destination where the backup will be stored. I chose my home directory, but you can back up to a remote FTP server for added security if you have access to one.
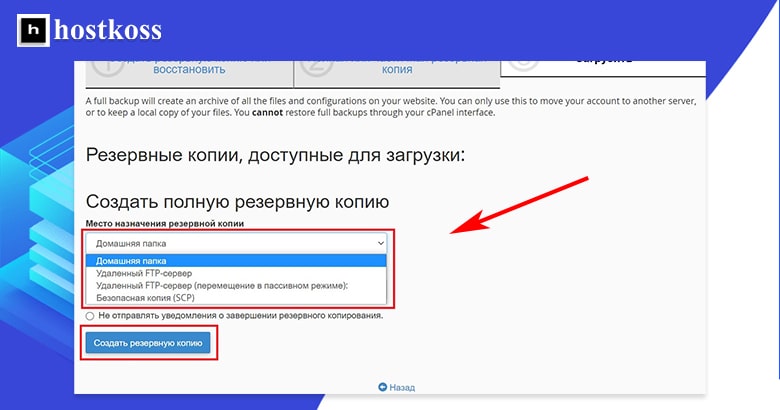
You will automatically receive an email that the backup is complete
Backups may take some time, depending on the size of your site. You will automatically receive an email notification when the backup is complete, unless you select the checkbox to not receive a notification.
How do I add a password to a catalog in cPanel?
Adding a password to a directory prevents unauthorized users from accessing certain files or data. It is a simple process that consists of three steps.
First, click on Directory Privacy in the Files category.
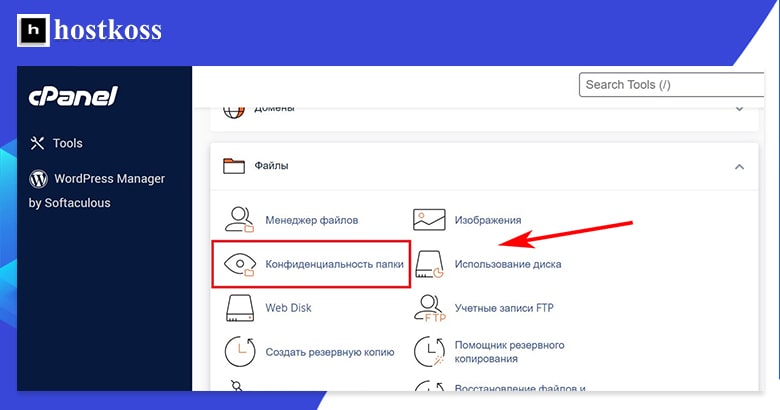
The Privacy catalog is located in the top row of the Files category
All directories for your site will appear in the list. If you have not added a password to a catalog, its privacy setting will be set to None.
Click the Edit button to the right for the catalog you want to password protect.
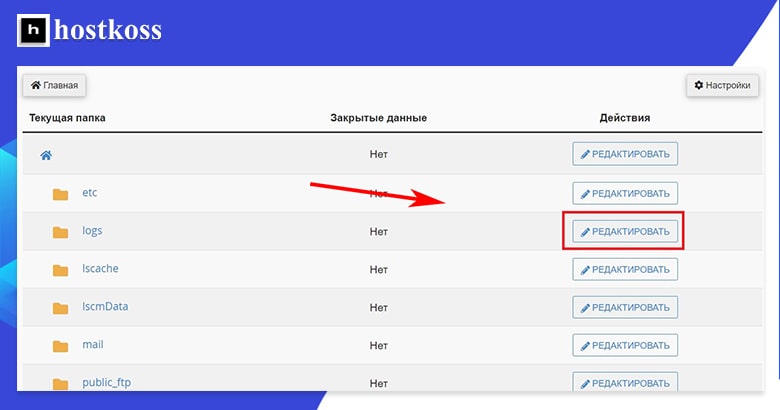
Changing the privacy settings to add a password to the catalog is easy
Finally, check the box under Security Settings to password protect the selected directory and click Save. Now every time someone tries to access the directory, they will need to enter a username and password.
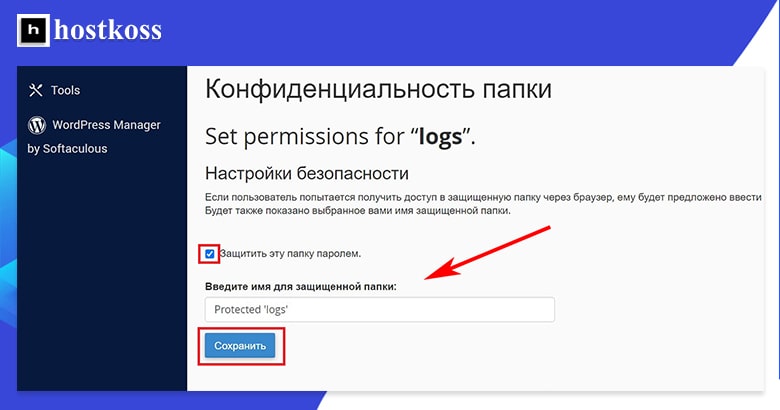
To password-protect the directory, you just need to tick the box
If you return to the first page of Directory Privacy (by clicking on Directory Privacy in the Files category), you will see that the directory you just password protected now has a lock added to the icon, as well as the lock icon and the word Yes in the Private column.
How do I block traffic from certain IP addresses?
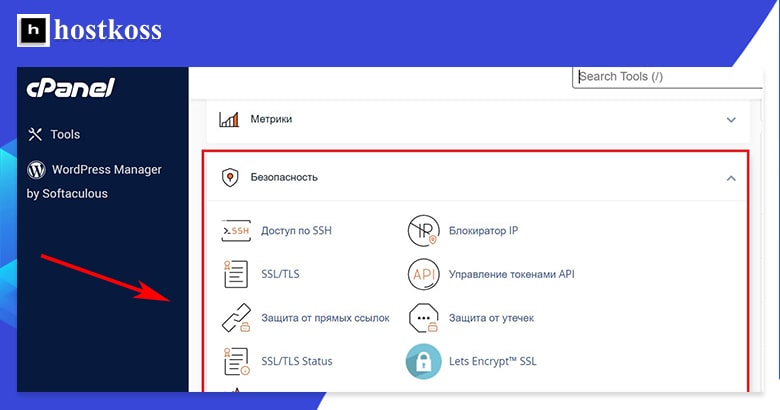
cPanel has a security feature called IP Deny Manager (or IP Blocker) that allows you to block access to your site from certain IP addresses.
To use IP Deny Manager, click IP Blocker in the Security category.
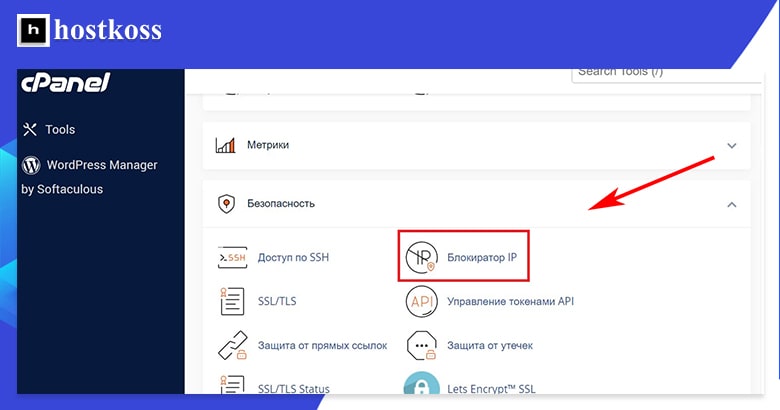
IP Address Deny Manager and IP Blocker are the same thing in cPanel
You can block a single IP address or a range of IP addresses with IP Blocker using the formats shown in the image below. You can also simply enter a domain name and the IP Blocking Manager will determine the IP address for you.
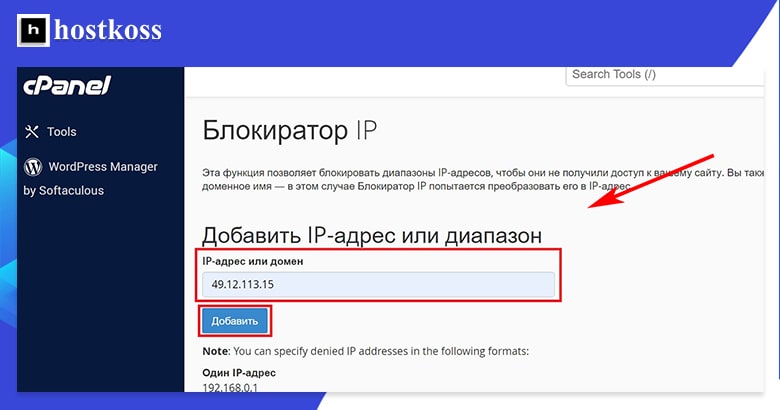
You need to identify the IP address you want to block
Once an IP address is blocked, it will appear in the list of blocked IP addresses. For this example, I chose to block a random IP address in Antarctica. But you can easily remove an IP address from the blocked list by clicking delete.
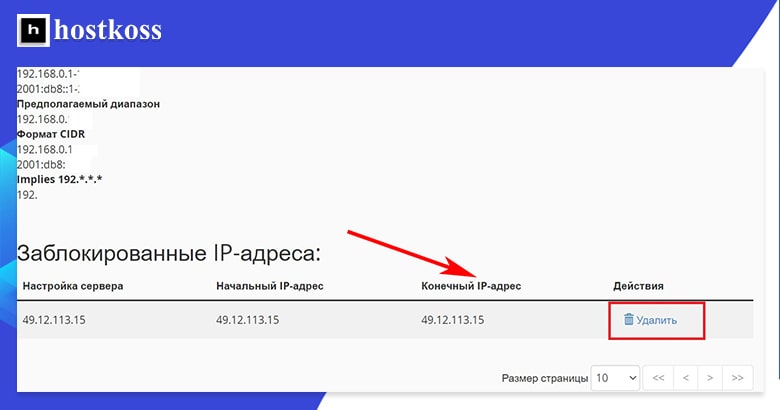
You can restore IP address access to your site with a single click of the Remove button
You can find additional security tools available to you under the Security category in cPanel.
There may be many other security options, depending on your web host and the plan you are on. In any case, do your research or contact support before configuring security settings that you are not familiar with.
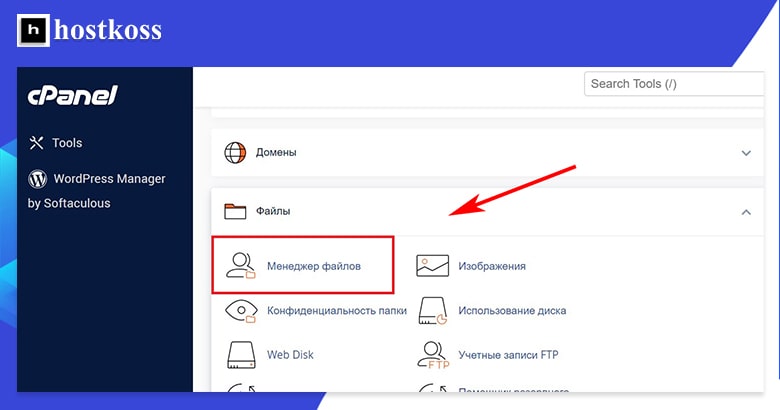
File management with cPanel
The cPanel file manager allows you to upload and download files to and from the server, as well as manage existing files. It is a simple built-in option that you can use instead of installing separate FTP software on your computer. You can access it in the Files category of the cPanel Tools page.
To upload a file, you must first click on the Upload icon.
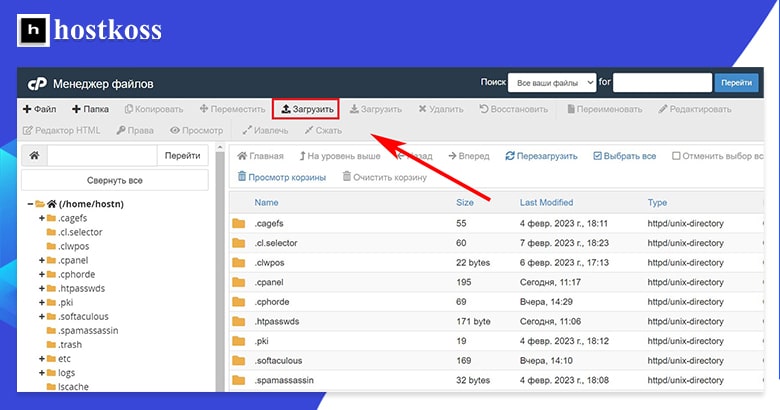
The main functions of the File Manager are located on the top toolbar
From here, you can either drag a file or group of files into the window, or select an individual file to upload.
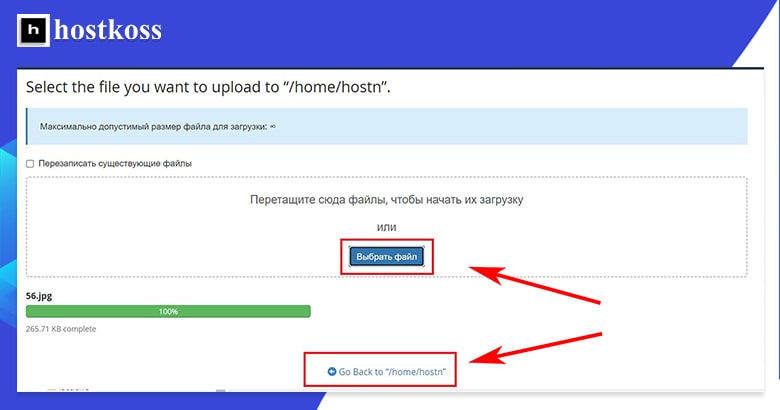
The status bar at the bottom of the page will notify you when your files are uploaded
After you upload a file, it will appear in the list in the File Manager. If you click on a file, the top toolbar will show all available functions for that file. You can copy the file, upload it, delete it, rename it, and view it.
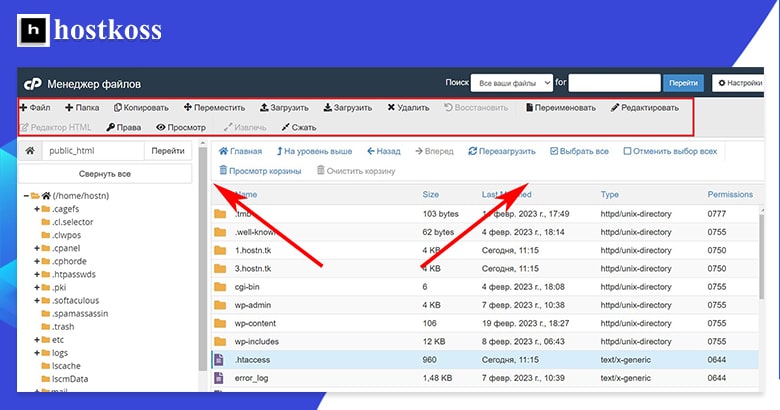
The cPanel file manager provides you with extensive tools to manage your files
Tip: be careful if you decide to manage files from the file manager – deleting, renaming or replacing the wrong files in cPanel can break your site.
How do I upload files via FTP?
Another way to upload files to your website is with a File Transfer Protocol (FTP) account. If you set up an FTP account, it can be a more reliable way to upload files directly from your device to your server. But there are a few steps you need to follow to create an FTP account.
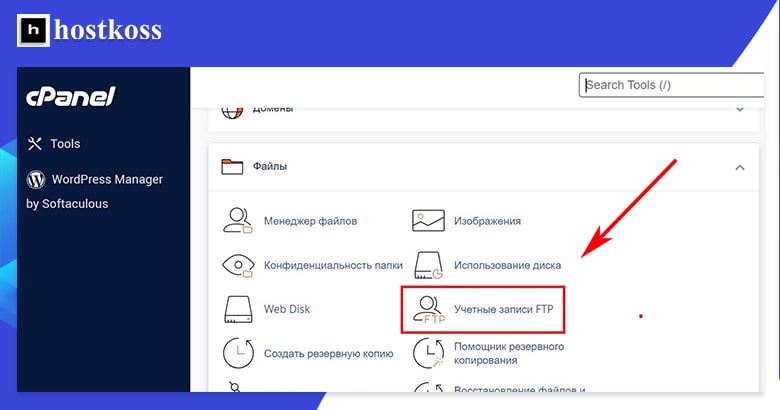
Almost all hosting providers provide FTP access. If your hosting provider provides this access, the first thing you’ll need to do before you can upload files is to create an FTP account. To create an FTP account, click on FTP Accounts in the Files category.
This will take you to a form that you need to fill out to create an FTP account. You will need to create a username, select the domain to which you want to link the account, and create a password. You can also limit the amount of data that a user can upload by configuring a quota for the account.
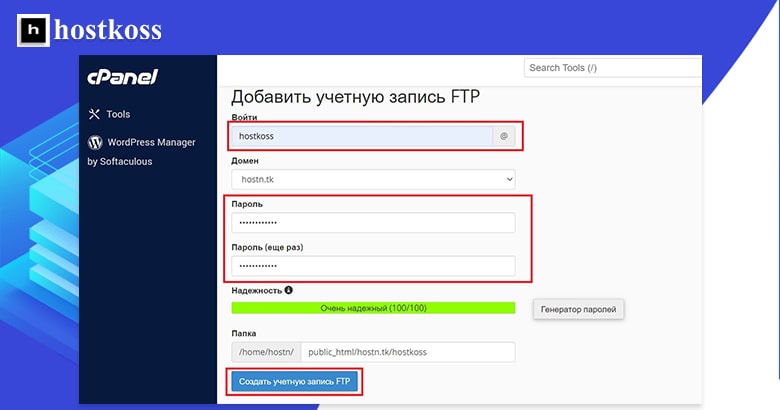
You can create multiple FTP accounts through cPanel
After you create an FTP account, it appears in the list on the FTP Accounts page. You can change the password, quota, or delete an FTP account from this list.
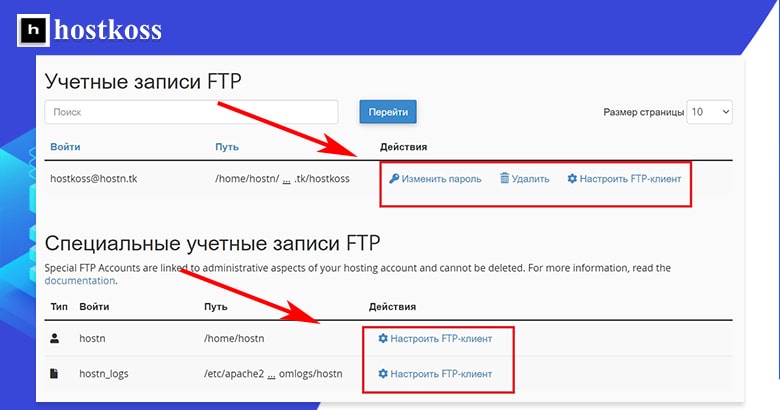
But before you can upload files, you need to install an FTP client on your computer. This is a program that will allow your computer to communicate with your FTP account. cPanel works with Cyberduck for Mac or CoreFTP for Windows, but just about any FTP client will do.
To install an FTP client, you need to go to the FTP client’s website and download it.
After installing the FTP client, go back to the FTP list in cPanel and click the Configure FTP Client button, which you’ll find among the functions for each individual FTP account. Then click the FTP Configuration File button for the FTP client you are using.
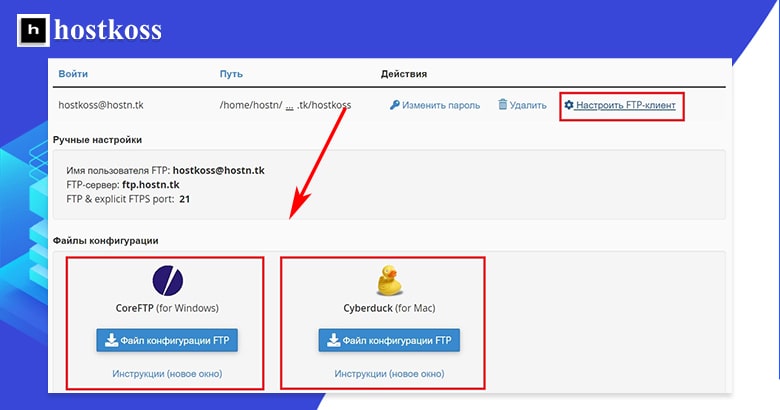
When you click the FTP Configuration File button, a window for your FTP client will open on your computer. Your username should already be entered, but you will need to enter the password you created for your FTP account.
Once you open a connection in the FTP client, you will be asked to log in again, and this time you will also need to enter the address of your FTP server. Your FTP server is simply “ftp.yourdomain.com“.

You can also find your FTP server address when configuring the FTP client for a specific FTP account on the FTP Accounts page.
At this point, you’ll be ready to upload and download files. And like I said, once you’ve set up your FTP account, this method can become faster and easier. Simply select the file or files you want to upload and drag and drop them into the FTP client window. As your files are uploaded, you will see a report of the transfer status.
Files uploaded via FTP go directly to your hosting folder. If you want to manage them through the file manager, they will be located under your site directory and username, which you can find on the left side of the file manager interface.
Database management with cPanel
Databases give you the ability to store information and access it easily. They are essential to running a WordPress site, as all of the text content on the site is contained in a database. If you use an automatic installation program like Softaculous, you probably won’t have to worry about databases at all because they will be created automatically during the WordPress installation. But I’ll still tell you how to create and manage the database manually, in case you ever need to create it separately.
There are two ways to create a new MySQL database from cPanel. The easiest way is to open the “Databases” category and click on “MySQL Database Wizard“.
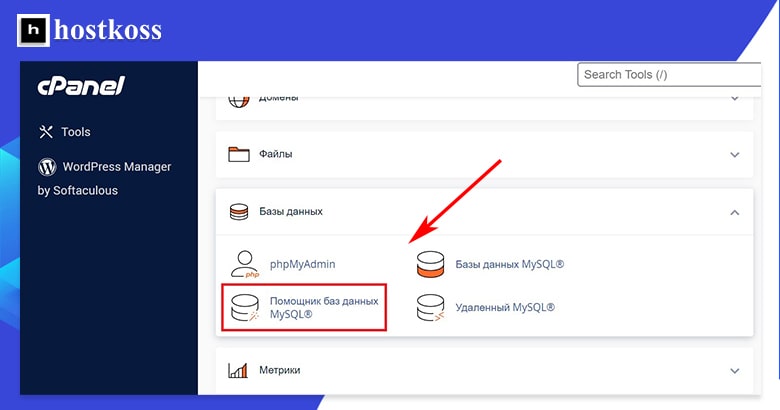
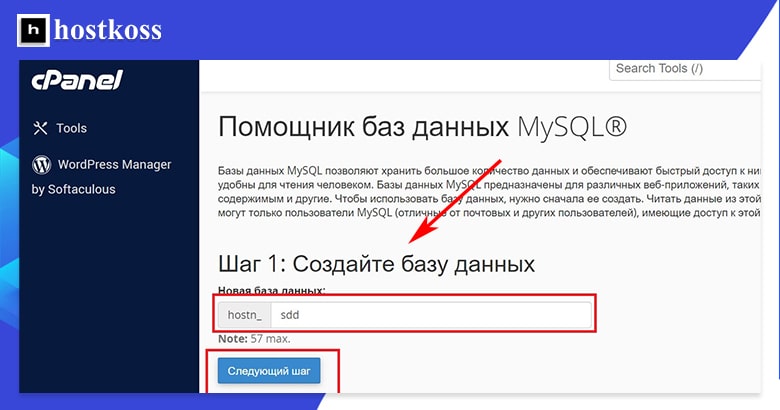
This is a three-step process that will allow you to create a database, add a user, and assign privileges.
Step 1. is to come up with a name for the database.
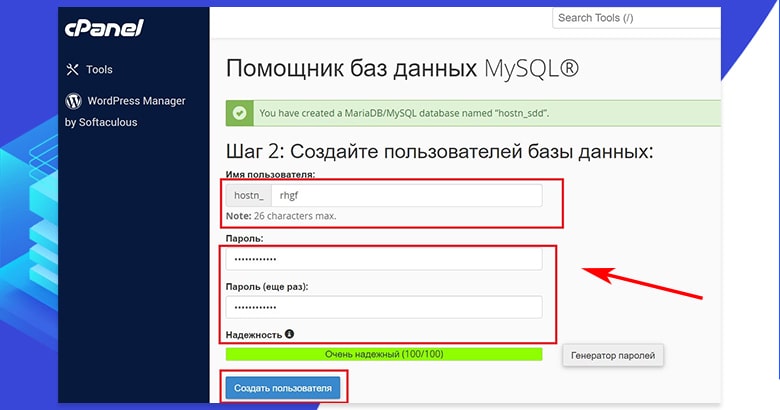
Step 2. requires adding a user and creating a password for that user. You can use a password generator to come up with a very complex password, but remember that you cannot use special characters in a MySQL database password.
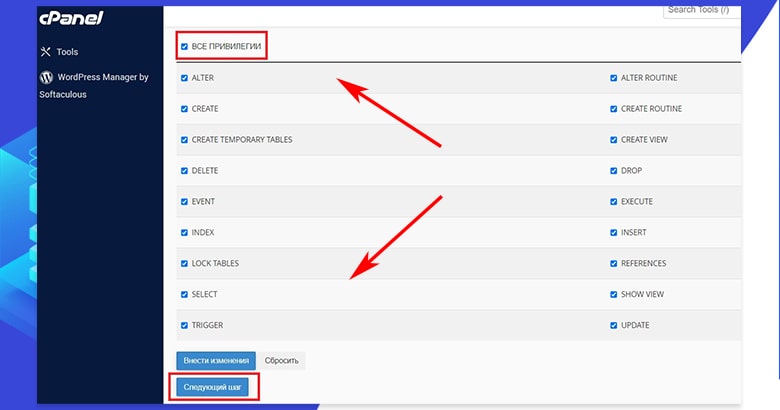
Step 3. is to assign privileges to the newly added user. You can mark either few or many privileges that you want the user to have. This depends on the purpose of your database, and you can find information about this in the help files for the software your database is being created to support.
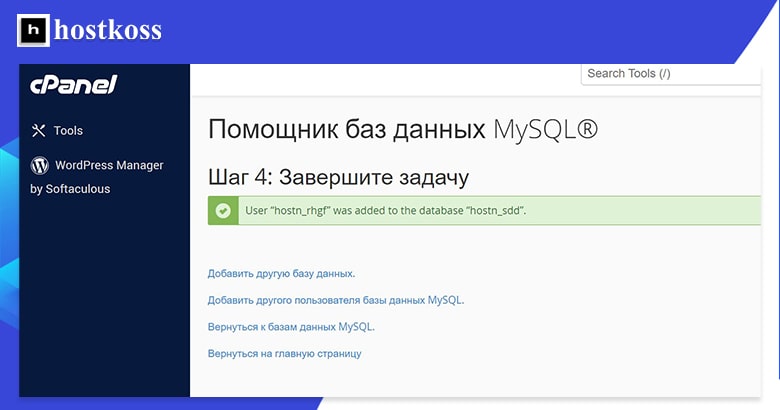
There is a fourth and final step of the MySQL Database Wizard, but it is not really a step. Rather, it is simply completing the task by choosing whether to add another database, add another user, return to the cPanel home page, or return to your MySQL databases.
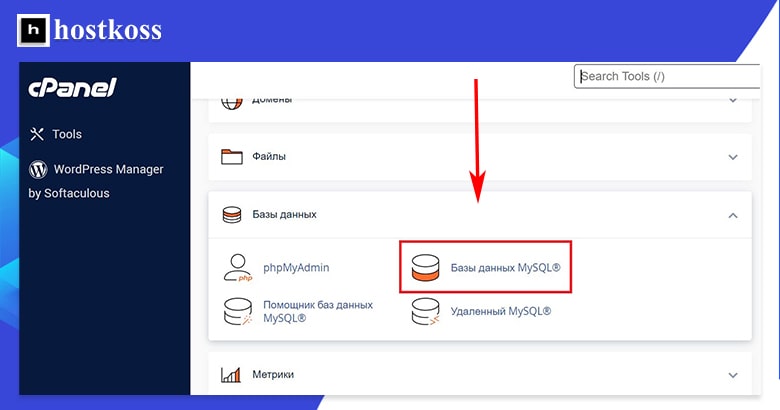
If you click Return to MySQL Databases, you will be taken to the MySQL Database Management page. You can also get to this page by clicking MySQL Databases (not MySQL Database Wizard) in the Databases category.
The first thing you’ll see on the MySQL database management page is the option to create a new database. Although this is a quick, one-step way to create a database, you still have to add users and privileges later to use the database, so it is not as efficient as the Database Wizard.
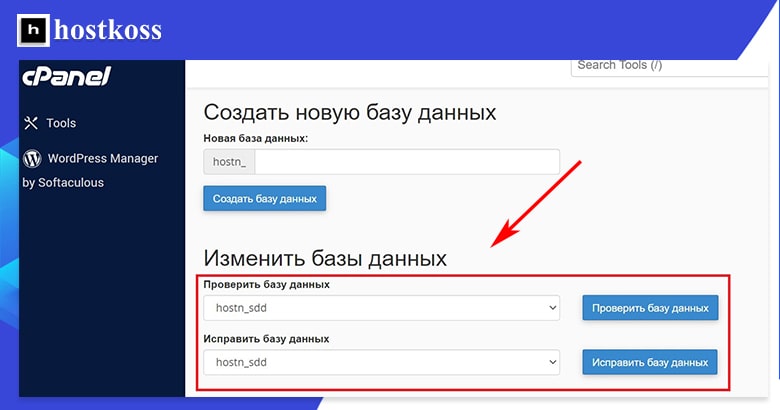
If you scroll down the page, you will find a section where you can modify the databases by checking or restoring them. Checking the database allows you to detect problems. Fixing the database fixes these problems. You will also find a list of all current databases and associated user accounts.
Next, on the MySQL database management page, you will find a section for adding new users. The process is the same as in the Database Wizard: come up with a username and give them a password.
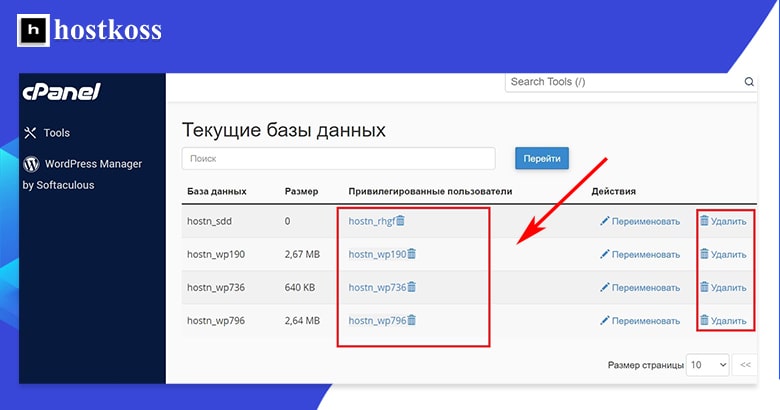
At the bottom of the page, you’ll be able to see all current users, as well as add users to existing databases. When you add a user to a database, you will automatically be redirected to a privileges page similar to the one in the MySQL Database Wizard. After assigning privileges to a user, you will be taken back to the MySQL database management page.
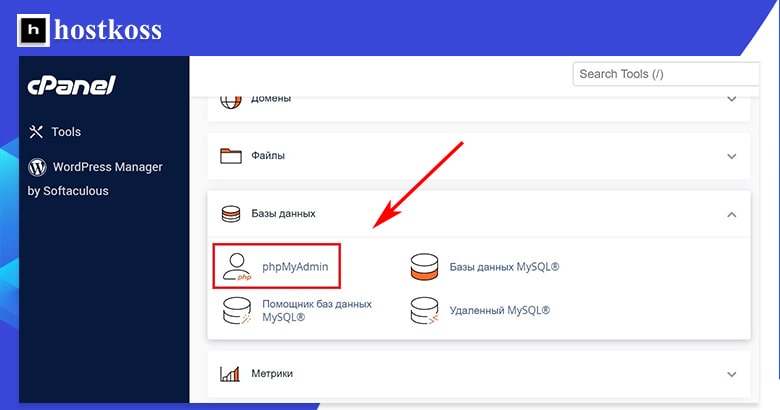
Working with phpMyAdmin in cPanel
You need to use the phpMyAdmin database management panel. You can find phpMyAdmin under the “Databases” category in cPanel.
When the phpMyAdmin control panel opens, click on the database you want in the left navigation bar.
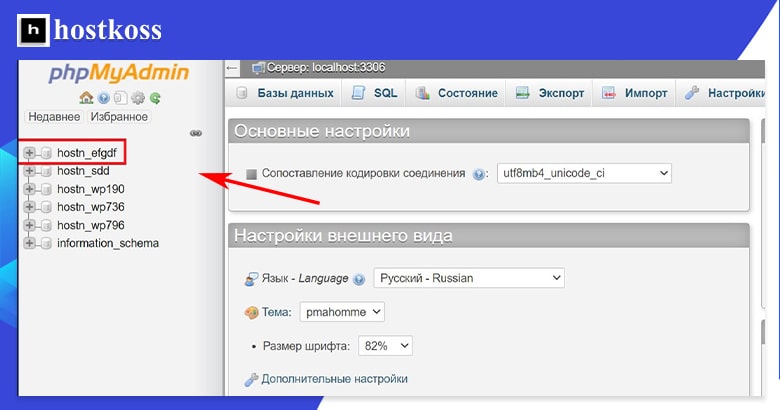
With phpMyAdmin, you can dump the database or load the database.
cPanel is easy to use if you know what you are doing
The time spent reading this guide may be more time than you will need to work with cPanel the first time you start it.
Once you have installed WordPress and selected a theme, you can begin building your site and preparing it for publication. You can return to cPanel to customize security features and other additional elements as needed before launching your site, and you can always refer to this guide or the cPanel solutions page if you need additional help.
Once you get comfortable with cPanel, it will become a handy tool to help you manage your site.
FAQs (Frequently Asked Questions)
To access cPanel, simply log in to your web hosting account provided by your hosting provider. Once logged in, you can access cPanel through the control panel interface.
Yes, cPanel offers an easy-to-use application installer called Softaculous, which allows you to install WordPress and other popular CMS platforms with just a few clicks.
While cPanel is widely used by many web hosting providers, it’s essential to check with your hosting provider to confirm if they offer cPanel as part of their hosting packages.
Yes, cPanel allows for customization of the dashboard layout and shortcuts for quick access to your most frequently used tools and features.
If you forget your cPanel password, most hosting providers offer a password reset option through their account management portal or by contacting customer support.
Yes, cPanel is designed to manage multiple websites efficiently, allowing you to add addon domains and subdomains to your hosting account.