You may be just getting started with web hosting and managing your own website, or you may be an experienced user looking for a refresher. Either way, editing your domain’s DNS records is an important part of managing your website. But what if your website is running on the cPanel platform? How do you fix or change DNS records? Let’s find out.
It is important to note that in order to edit domain DNS records in cPanel, your site must use the DNS servers of your hosting. In our case, these are ds1.hostkoss.com and ds2.hostkoss.com. If your domain uses other DNS servers, such as Cloudflare or your domain registrar, you will only be able to edit DNS records on their platforms.
So, before you start the process of editing DNS records in cPanel, make sure that your domain is configured to use your hosting’s DNS servers. And if it is, then you are ready to move on.
How to find the DNS record editor in cPanel
To find and edit the DNS records for your domain, you first need to log in to your cPanel control panel. When you are in the panel, go to the Domains section, which can be found on the home page.
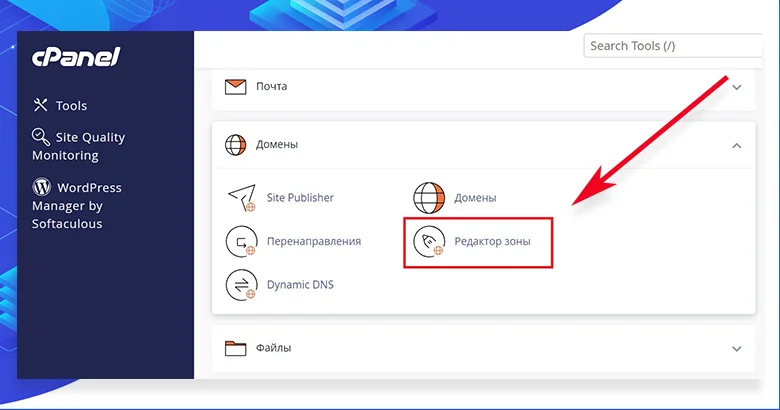
You will see several options there, but your goal is to find the “Zone Editor” example. This is the tool that will allow you to edit your domain’s DNS records.
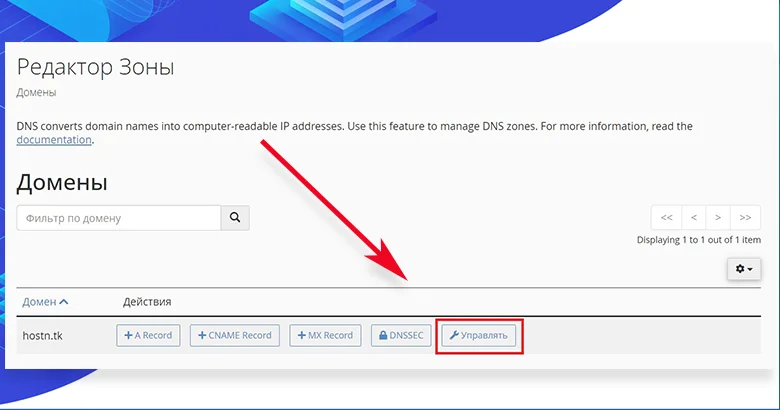
When you open the Zone Editor, you will be greeted with a list of all the domains that are linked to your account. Each of them will have buttons next to them that allow you to quickly add popular types of DNS records or select “Manage” to edit DNS records for that particular domain.
In the Manage section, you will see a complete list of DNS records that have already been created for your domain.
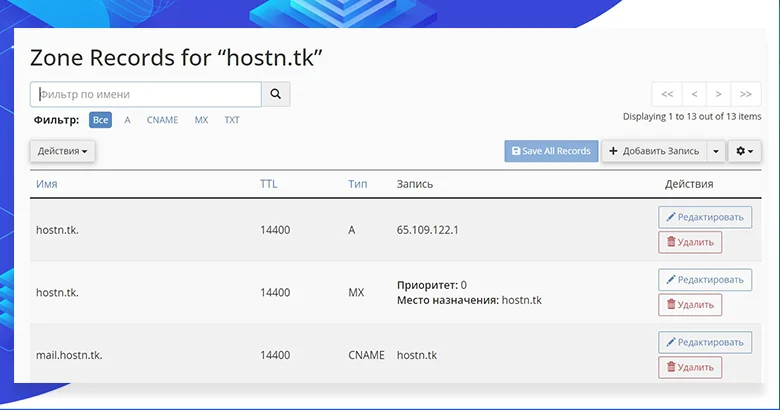
Here you can edit, delete, or add new entries according to your needs and the requirements of your site.
How to add a DNS record in cPanel
To add a new DNS record to your domain in cPanel, go to the Zone Editor section and find the table with the existing records. On the right side of this table is the “Add record” button, which you should click.
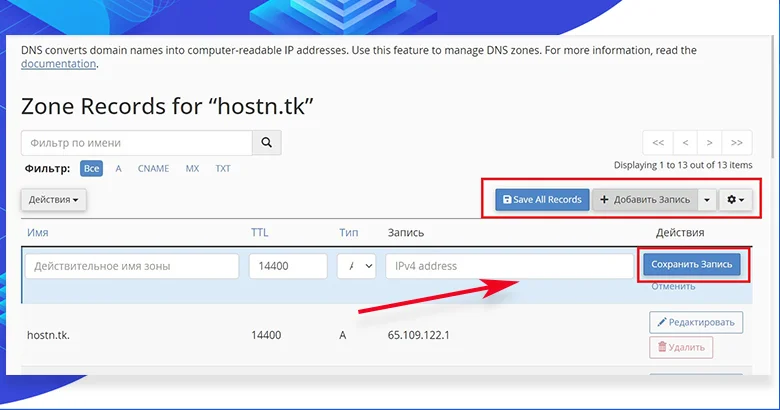
After clicking the “Add Record” button, an empty line will appear at the top of the table. Here you need to fill in several fields according to the type of DNS record you want to create.
The “Name” field indicates the domain or subdomain for which the record is being created. The“TTL” field specifies the lifetime of the record in seconds (1200 by default). The “Type” and “Record” fields indicate the type and purpose of the new record, for example, the server’s IP address or a text name.
In some cases, additional fields may be required, such as “Priority” to set the order in which the records are used or “Port” to specify the server port.
When all the required fields are filled in, click the “Save” or “Add Record” button to create a new DNS record.
The zone editor in cPanel supports different types of DNS records that can be used depending on the needs of your site. These types include “A” for IPv4, “AAAA” for IPv6, “CAA” for SSL certificate management, “CNAME” for redirecting to a text server name, “MX” for specifying a mail server, “SRV” for other servers on the specified port, and “TXT” for service information or domain verification.
How to change DNS record in cPanel
If you want to change the DNS record for your domain in cPanel, first of all, you need to find this record in the list. Once you have found the record you need, click the “Edit” button in the row next to it.
Once you open the record for editing, you can make any changes you need. This can be correcting a typo or changing the record type completely. When you’re done editing, don’t forget to click the “Save record” button. After that, the page will refresh and your changes will be reflected in the table.
How to delete a DNS record
Now let’s talk about deleting a DNS record. Next to the “Edit” button, you will find the “Delete” button. Just click it, and then confirm your decision in the pop-up window. After that, the DNS record will be deleted and you will no longer see it in the table.
This is a fairly simple process that allows you to quickly and easily make changes to your domain’s DNS records right in cPanel.
How to reset a domain’s DNS zone
If you need to res et your domain’s DNS zone settings and restore them to the factory default, it is very easy to do. As a result, all the DNS records you created yourself will be deleted, and all the initial records will return to the state they were in before.
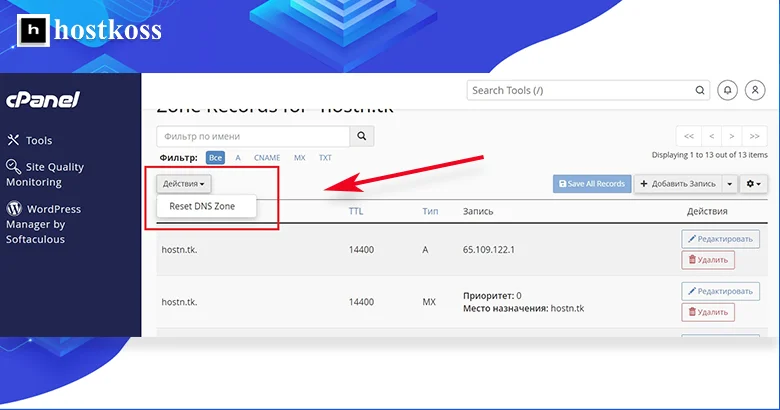
To do this, go to the DNS zone of your domain in your control panel. There, at the top of the table with records, you will find the “Actions” button. When you click on it, the option “ResetDNS zone” will appear. Select this option and confirm your action.
After confirming, all your settings will be reset and your domain’s DNS zone will return to the factory default values that were originally set. This can be useful in cases where you want to start from scratch or fix possible problems with your DNS settings.
Common problems with DNS records
When you encounter problems with DNS record setup, it’s worth knowing how to solve them. Here are some common situations and how to solve them:
- Delays in changing DNS: Sometimes, even after you make changes to your DNS, they don’t take effect immediately. It can take time, sometimes up to 48 hours. The solution in this case is usually simple: you just need to wait for the changes to propagate throughout the Internet.
- Errors in DNS records: Incorrect or missing DNS records can cause problems with your website or email. The solution here is simple: check your DNS records and correct any errors through your hosting control panel.
- DNS caching issues: Sometimes your browser or internet service provider can store outdated DNS data, which leads to problems. Clearing your DNS cache or changing your DNS server can solve this problem.
- Lack of DNS records: If your site is not displayed through the domain name, check the DNS records settings in your hosting control panel. Make sure that all necessary records are configured correctly.
- Problems with hosting DNS servers: If the problem lies with your hosting’s DNS server itself, contact support to resolve the issue.
Regardless of the problem, there is usually an easy way to resolve it using your hosting tools or by contacting support.
I can’t resolve DNS issues: What to do next?
If you are having trouble creating or configuring DNS records, or if you notice that they are not working properly, don’t hesitate or panic. Just describe your situation in the comments below or via live chat, and we’ll be happy to try to help you out.
Don’t forget that our team has also prepared other useful articles for you that may be of interest:
- How to install Let’s Encrypt SSL in cPanel
- How to use HTTPS redirects in cPanel
- How to create a WordPress site in cPanel Softaculous
- Getting started with cPanel: A beginner’s guide
- How to create a WordPress site in 2024
We hope that these materials will be useful for you in your activities. We sincerely wish you success in your web project and are always ready to provide the necessary assistance and advice.
Questions and answers about editing DNS records
DNS records (Domain Name System) are records that translate a domain name into an IP address to indicate where to direct requests for web pages and other services.
Log in to cPanel, select the “Zone Editor” or “DNS Zone Editor” icon in the “Domains” section, select the domain you want to edit.
Click the “Add Record” or “Add DNS Record” button, select the type of record (for example, A, CNAME, MX), enter the required data, and save the changes.
In the “Zone Editor” section, select the entry you want to delete and click the “Delete” or “Remove” button
In the Zone Editor section, select the entry you want to modify, make the necessary changes, and click the Edit or Save button.
In the Zone Editor, select a domain, add a new MX record with the required priority and mail server address.
In the Zone Editor, select a domain, add a new CNAME record with the name of the subdomain and the address to which it should refer.
In the Zone Editor, select the domain, add a new TXT record with the content required to confirm ownership.
In the Zone Editor, select the domain, add a new SPF record with content that indicates the allowed senders.
Use tools such as “nslookup” or online DNS checking services to see if updated DNS records are displayed.