NPATI Content Automation is a free WordPress plugin designed to bring marketplace management, social publishing, content planning and AI-assisted article workflows into one WordPress workspace. Instead of switching between your website, marketplace profile, social scheduling tools and content spreadsheets, you can manage many of these tasks directly from the WordPress dashboard.
The plugin connects WordPress with the NPATI platform and NPATI Hub. This gives site owners a single place to work with marketplace listings, videos, Shorts, social connections, scheduled posts and AI-assisted WordPress content.
Quick overview: NPATI Content Automation is free to install and use. OpenAI is optional. If you connect your own OpenAI API key for AI-assisted content generation, any OpenAI API usage is billed according to your own OpenAI account and usage.
Getting Started After Installation
After installing and activating the plugin, the first step is to connect it to your NPATI account. You can either sign in with an existing account or create a new one. During the connection process, review and approve the requested permissions so the plugin can securely access the NPATI features you choose to use.
Once the connection is complete, the plugin opens a workspace with several main areas, including Market, Hub, Content, Settings and Security.
If you are new to the NPATI marketplace itself, the guide How to Create a Listing on NPATI explains the standard listing workflow on the platform.
Market: Manage NPATI Marketplace Content from WordPress
The Market section is designed for working with marketplace content connected to your NPATI profile. It contains three main subsections:
- Listings
- Videos
- Shorts
Listings: Create a Marketplace Listing
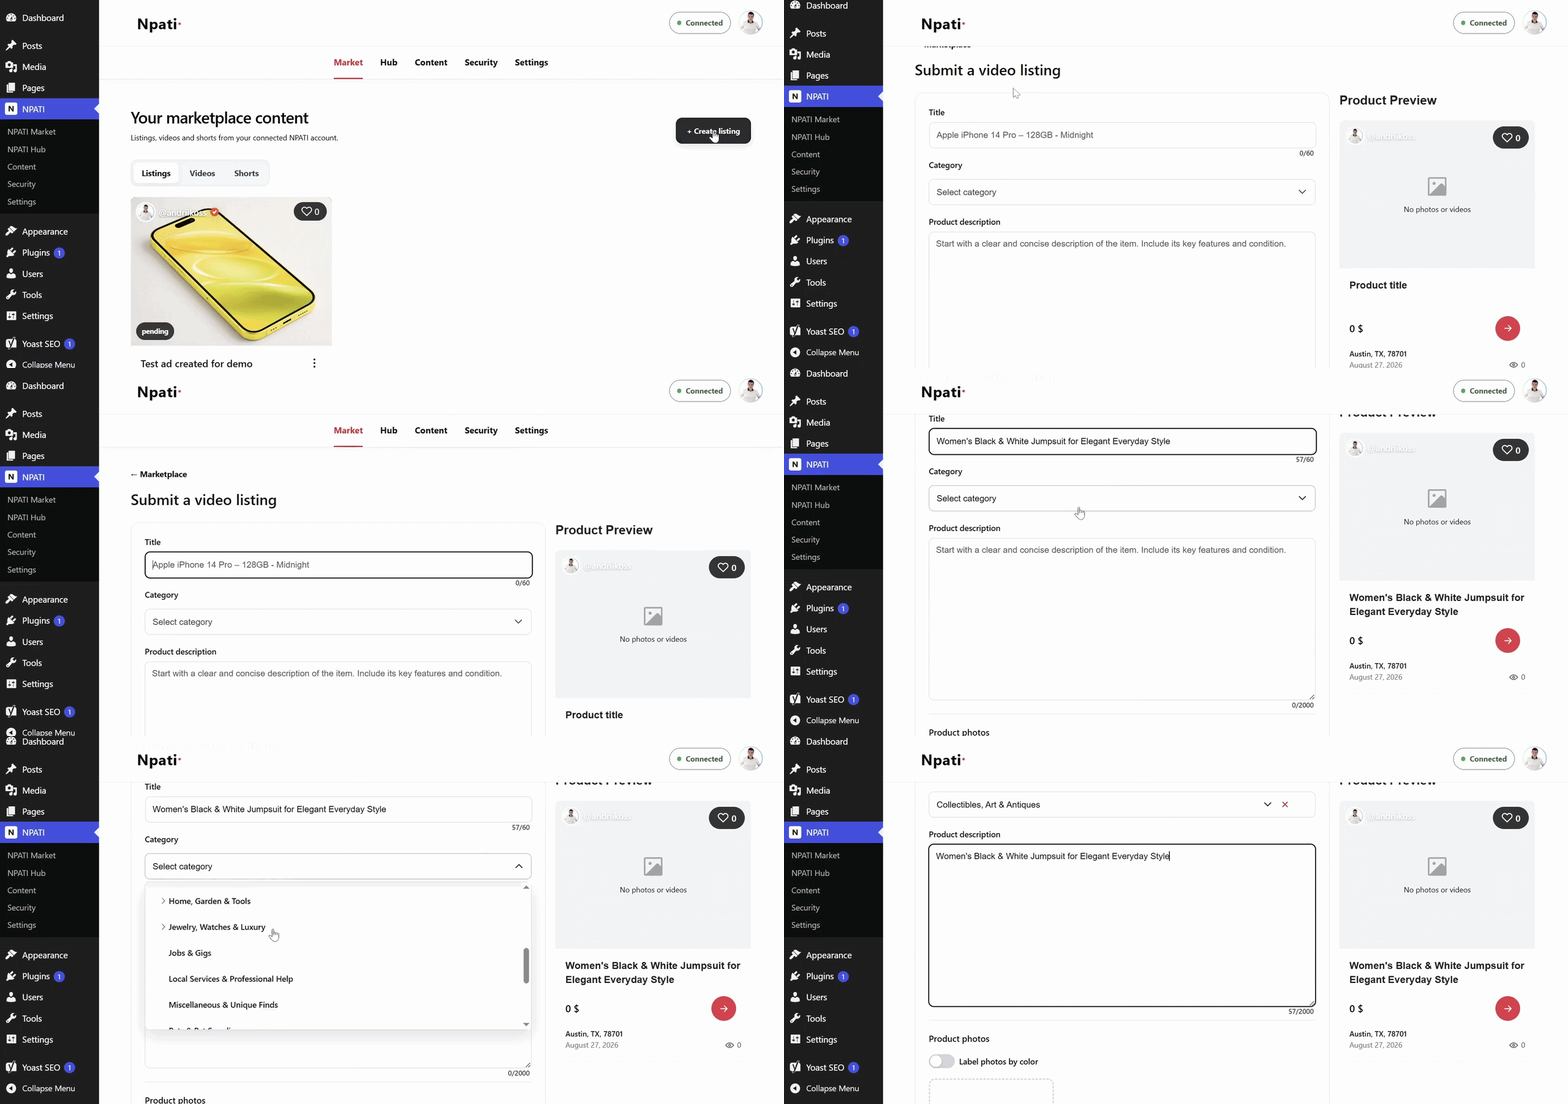
In Market > Listings, click Create listing to start a new marketplace listing. The first part of the form contains the essential product information:
- Title, with a clear product name such as Apple iPhone 14 Pro, 128GB, Midnight.
- Category, where you select the most appropriate marketplace category.
- Product description, where you describe the item, its condition, key features and other useful information for buyers.
The interface is designed to keep the workflow simple: fill in the listing details, add media, check the preview and publish when everything looks correct.

Add Up to Six Product Photos
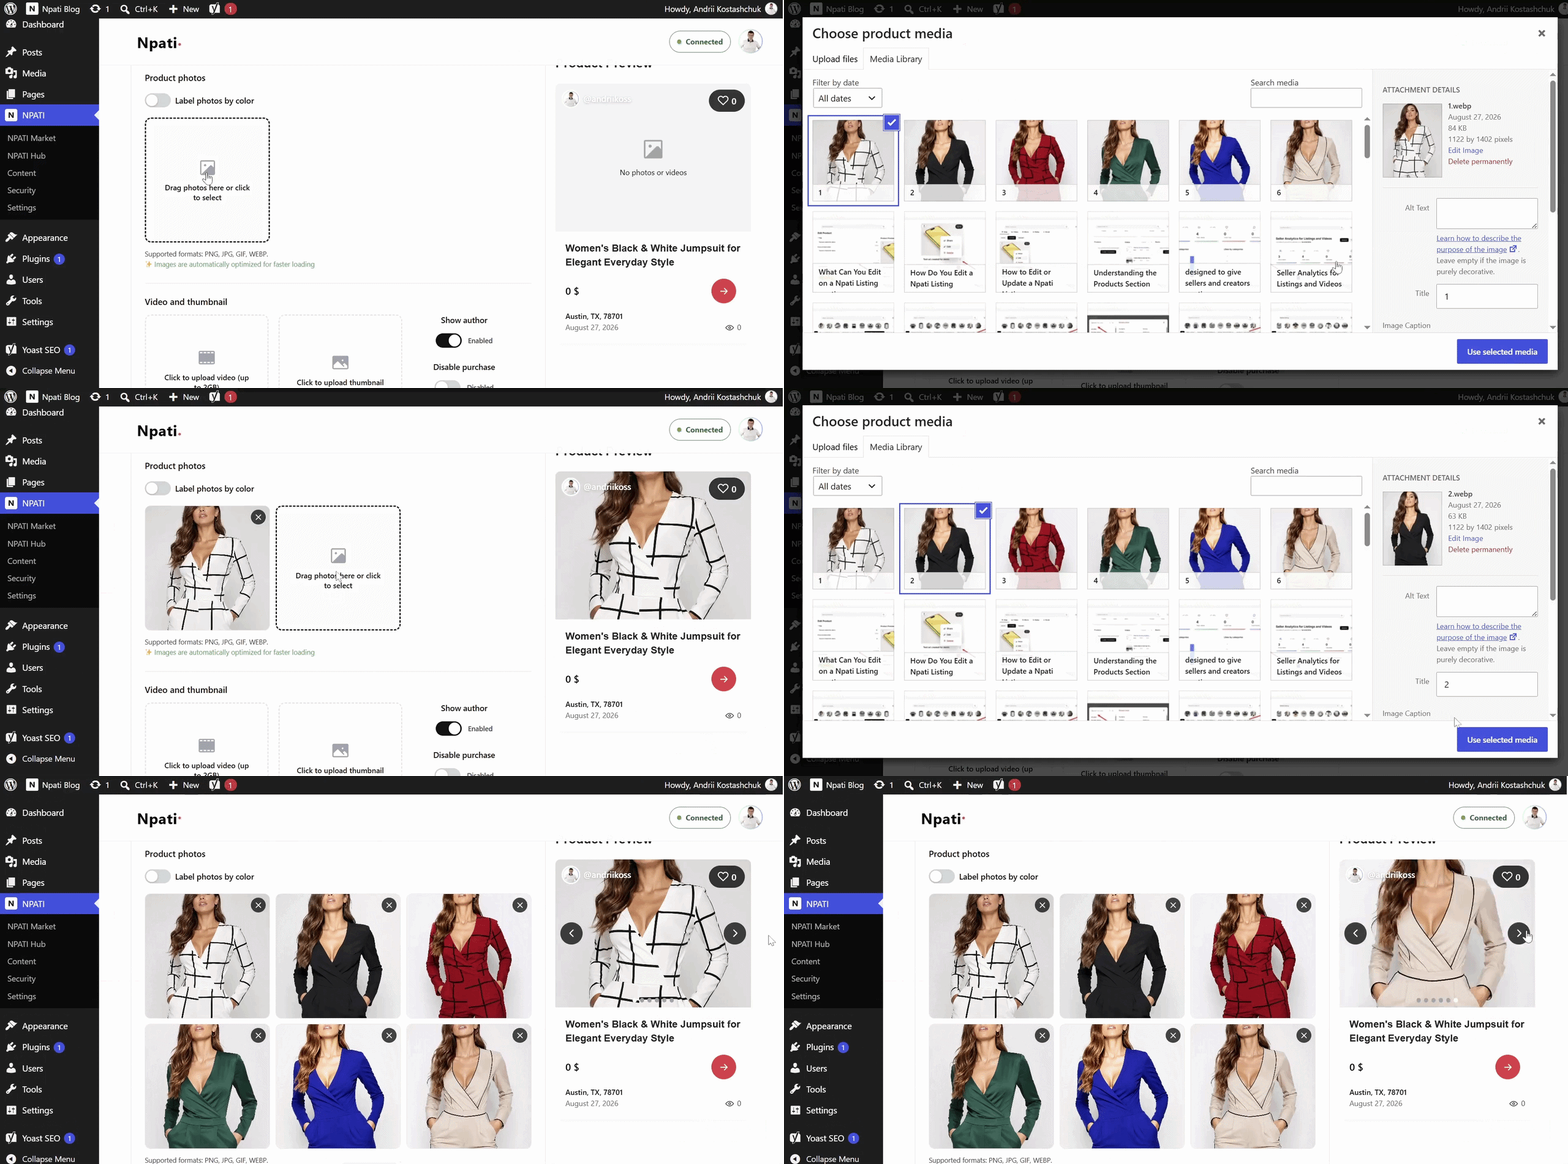
Below the main listing information, the Product photos area lets you upload up to six images. You can drag images into the upload area or click to select them from your computer.
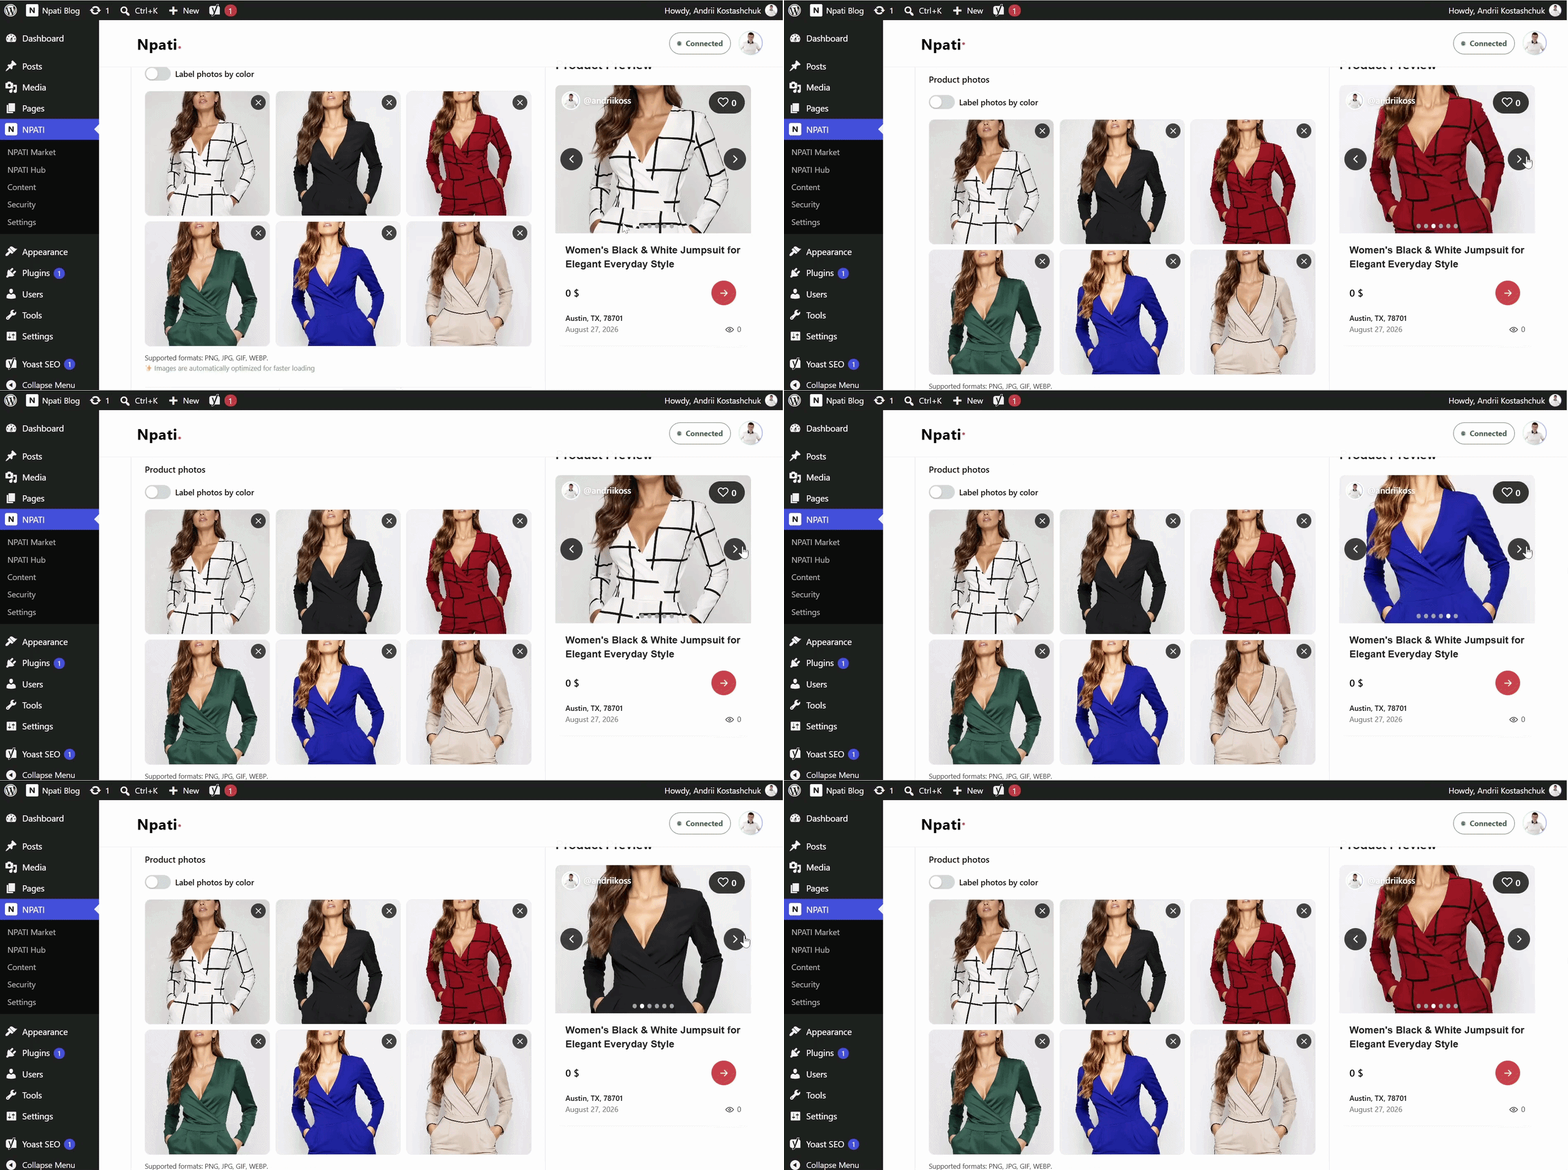
As the images are added, the listing preview on the right side of the screen updates so you can see how the final marketplace card will look before publication. You can also move through the media carousel in the preview to check each uploaded photo.

The carousel preview makes it easier to verify the image order, product presentation and overall appearance of the listing before it goes live.

Label Product Photos by Color
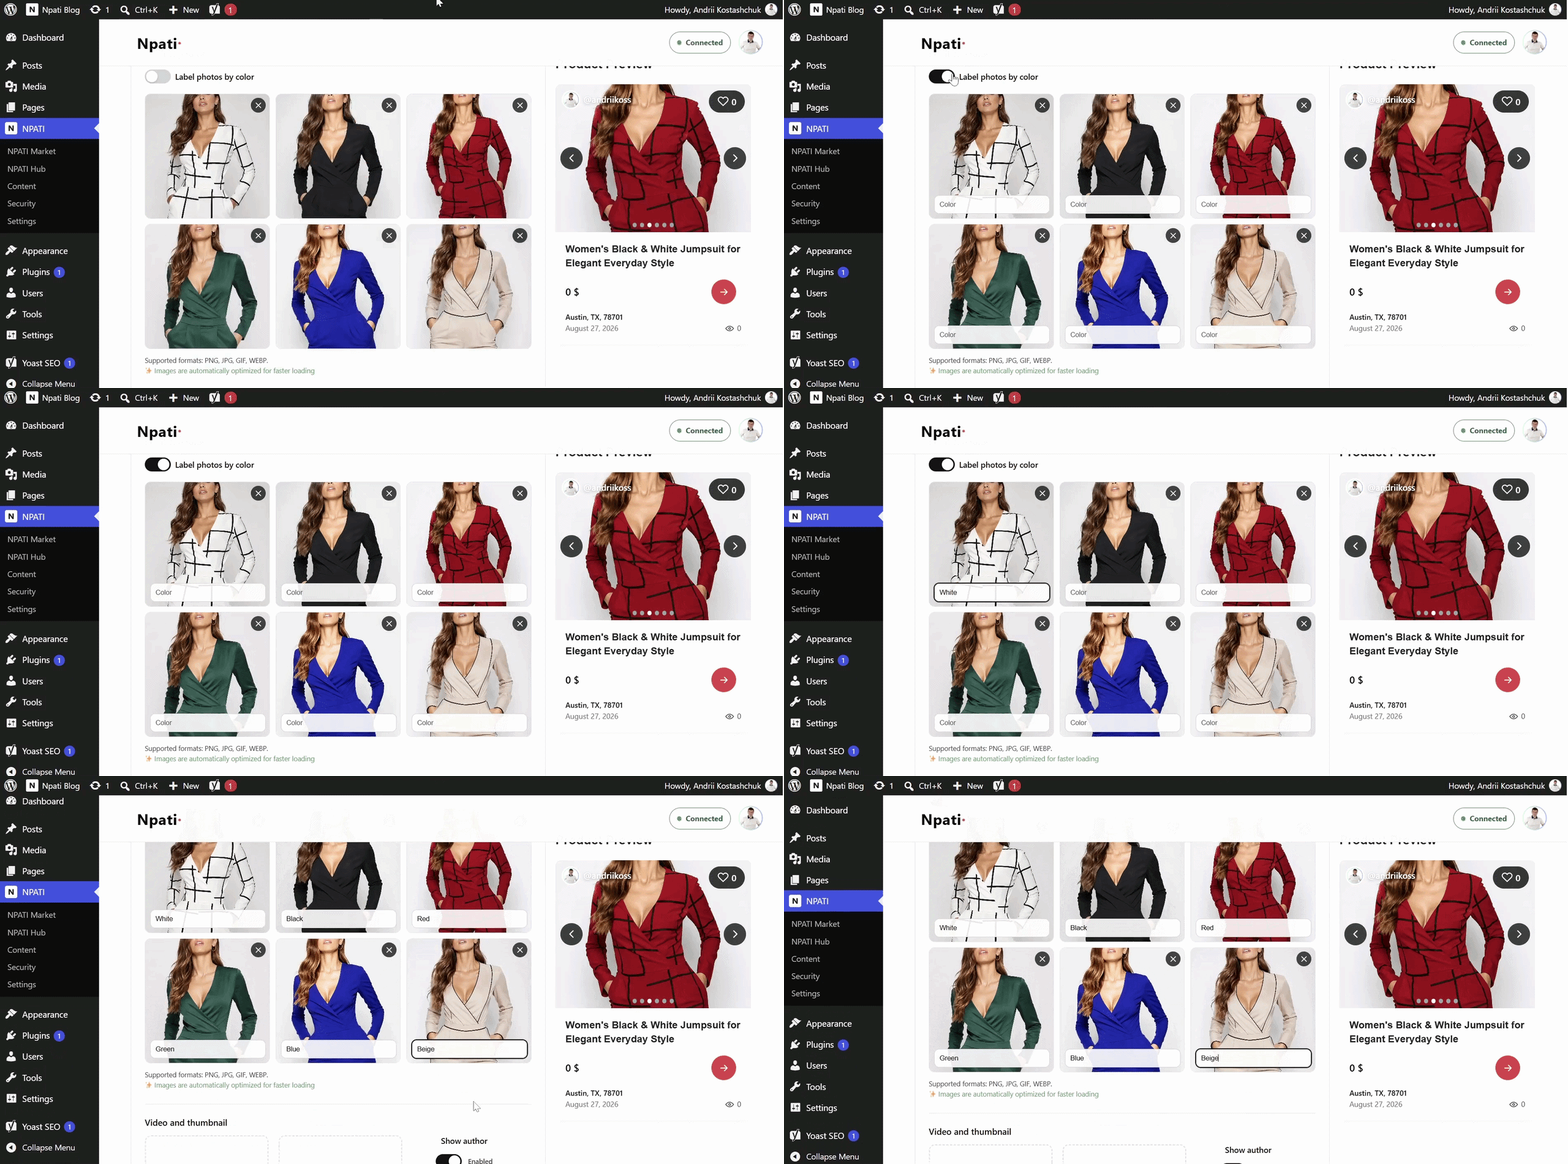
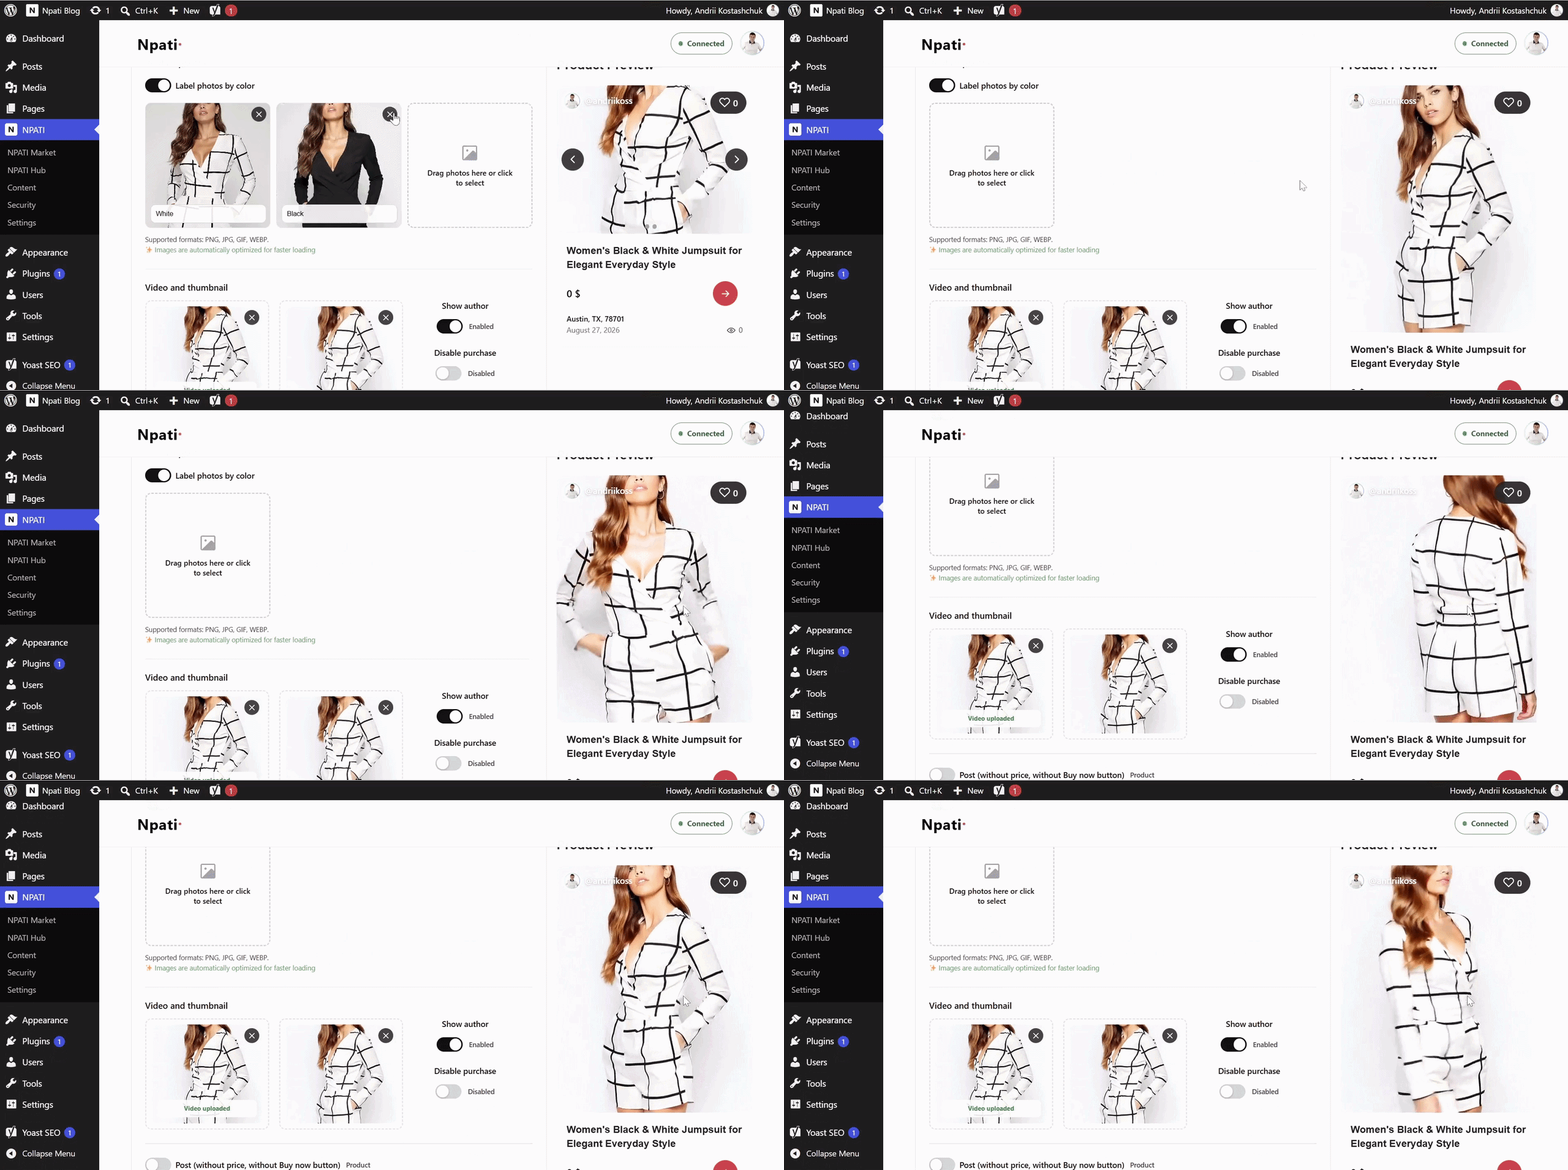
If the product is available in different colors, enable the Label photos by color option. A small field becomes available for each image, allowing you to enter the color represented in that specific photo.
This is useful for products such as phones, clothing, furniture, accessories, electronics and other items where buyers need to understand which image corresponds to which color variant.
Add a Product Video and Thumbnail
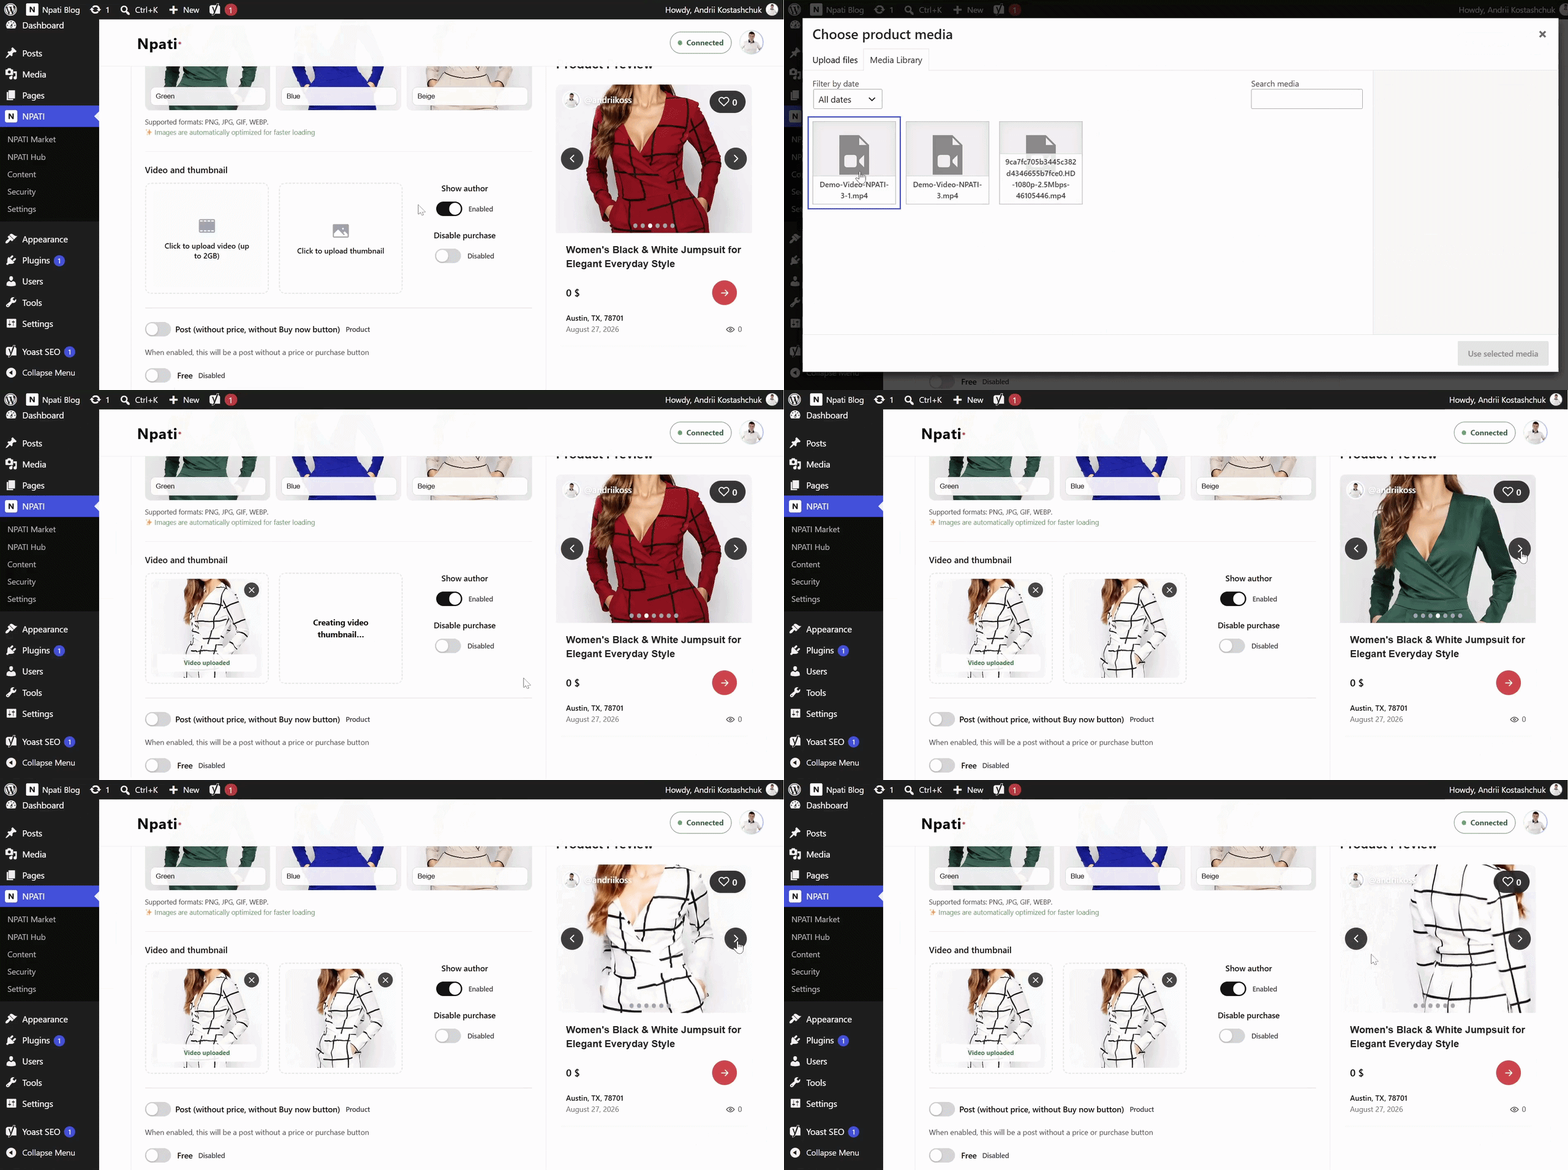
The listing editor also includes a Video and thumbnail section. You can upload a product video of up to 2GB and provide a thumbnail for the video.
When you use both product photos and video, the listing can contain up to six photos plus the video. In the preview carousel, visitors first see the photos and then the video. When the carousel reaches the video, playback can begin directly in the product presentation.
This format works well when photos provide quick visual details while the video demonstrates the product in greater depth.

Create a Larger Video-Focused Listing
You can also build a more video-focused listing. If you remove the six standard product photos and keep the video with its thumbnail, the visual presentation can use a larger video format.
This gives sellers two different ways to present a product:
- up to six photos plus a product video, or
- a larger video-focused presentation with a thumbnail.
The best option depends on the product and how you want buyers to experience the listing.
Set the Price and Publish
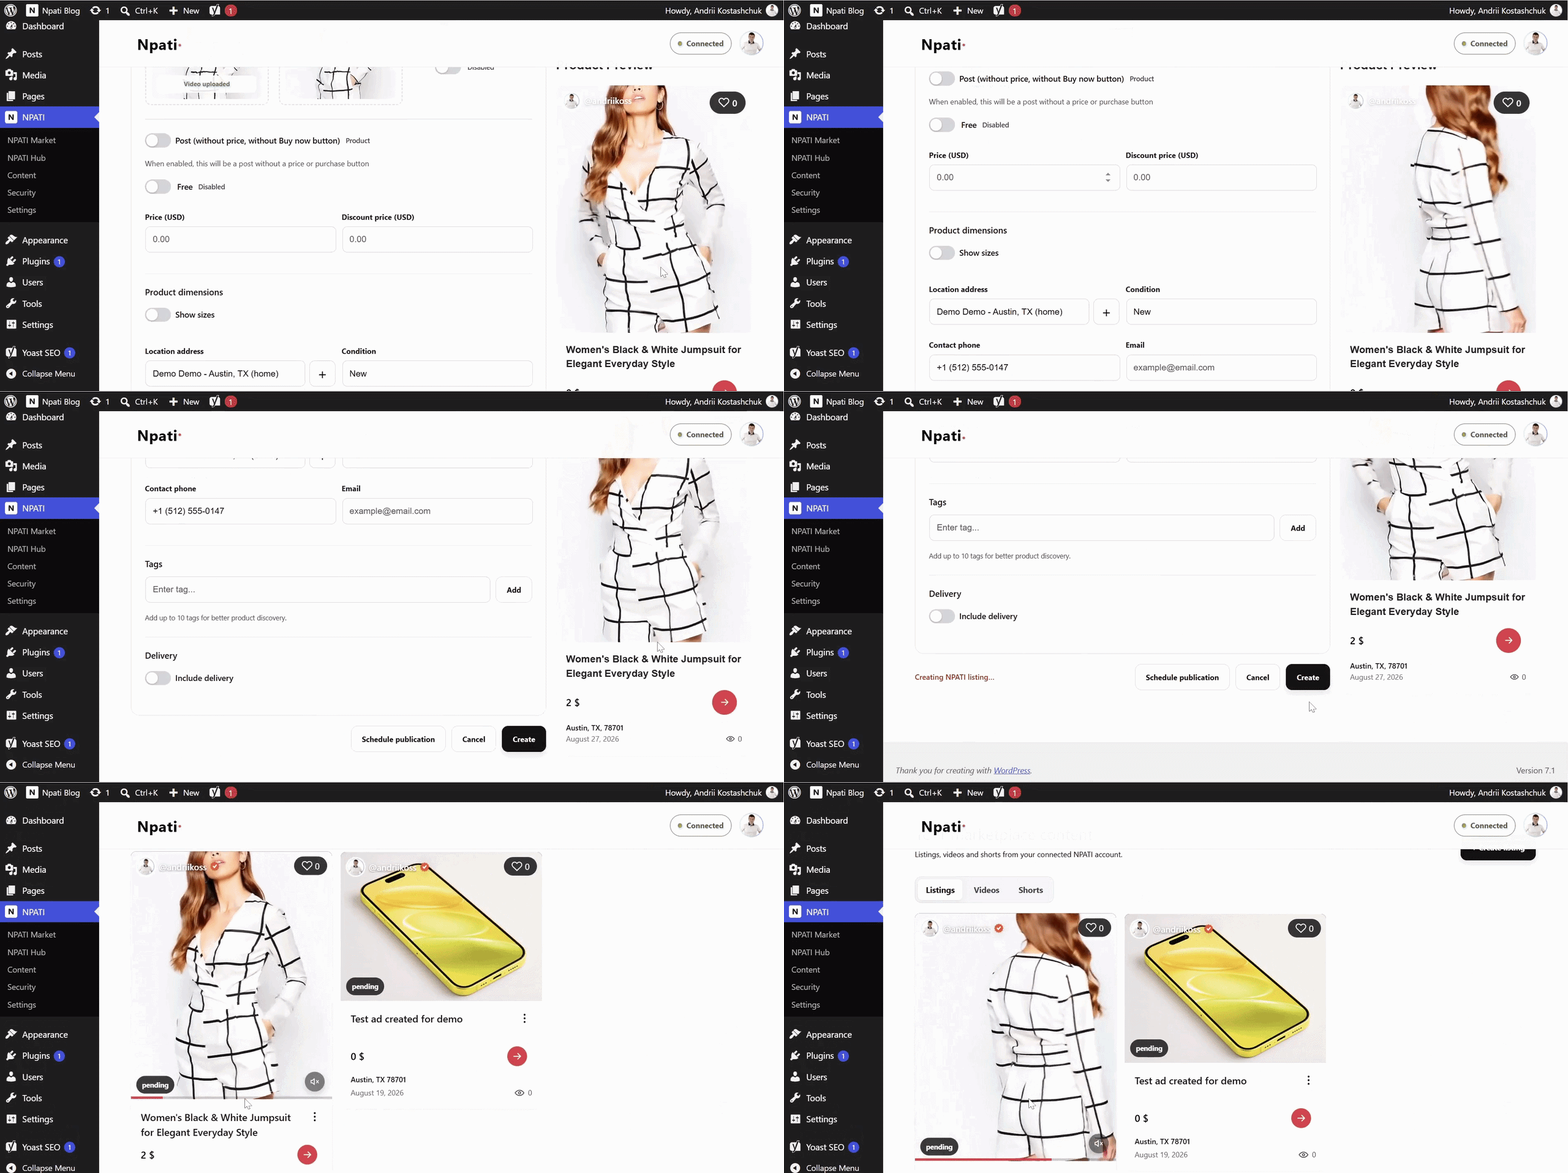
After the title, category, description and media are ready, enter the product price and complete the publication process. The listing is then created through the plugin and connected with your NPATI account.
This means WordPress can act as a convenient management workspace while the marketplace listing remains part of your NPATI profile.

For another detailed explanation of listings and marketplace management, see NPATI Content Automation for WordPress: Manage Listings.
Videos: View and Manage Video Activity
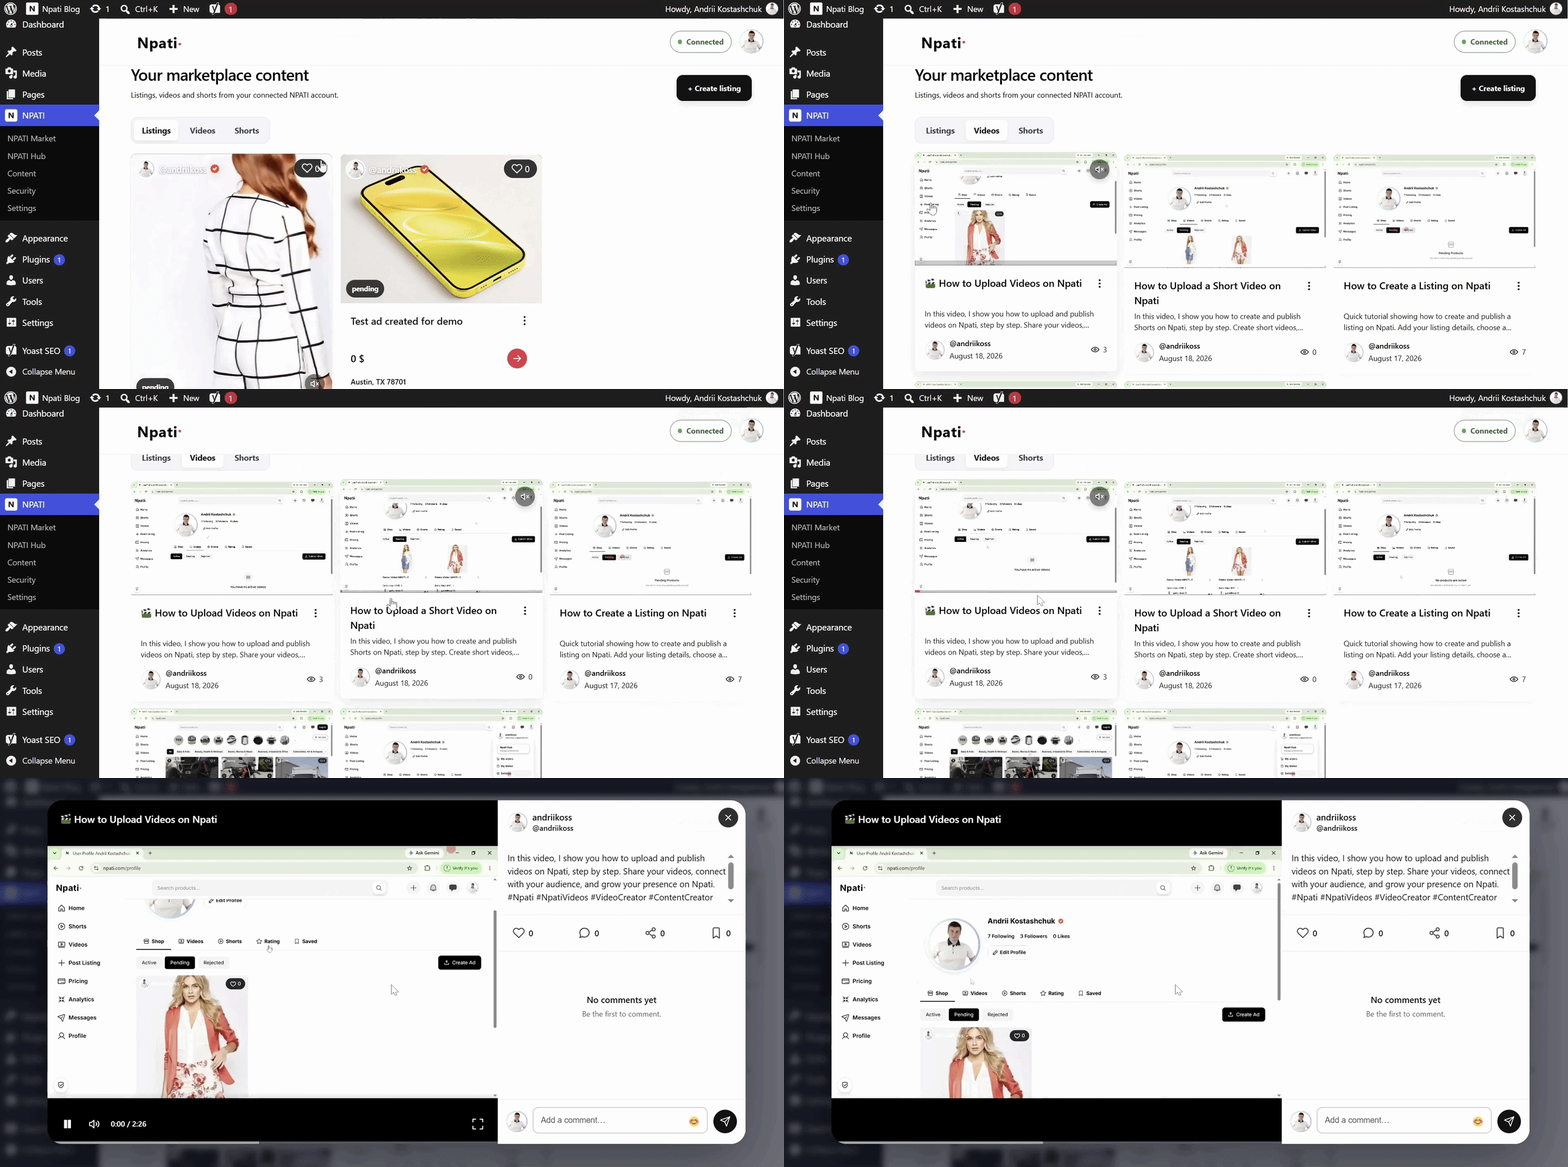
The Videos subsection displays videos associated with your NPATI profile. From the plugin, you can review the video content and see related activity.
If viewers leave comments on a video, the interface also gives you a convenient place to review the conversation and reply when needed. This helps keep marketplace and video engagement closer to your normal WordPress workflow.

Shorts: Access Your Short-Form Videos
The Shorts subsection displays short-form videos uploaded to your NPATI profile. It provides a simple view of your short video content without requiring you to leave the WordPress workspace.
Hub: Social Publishing and Connected Services
The Hub section connects the plugin with NPATI Hub, the area responsible for social integrations and scheduled publishing. It contains four main subsections:
- Overview
- Create Post
- Calendar
- Connections
You can manage and add supported social integrations through NPATI Hub.
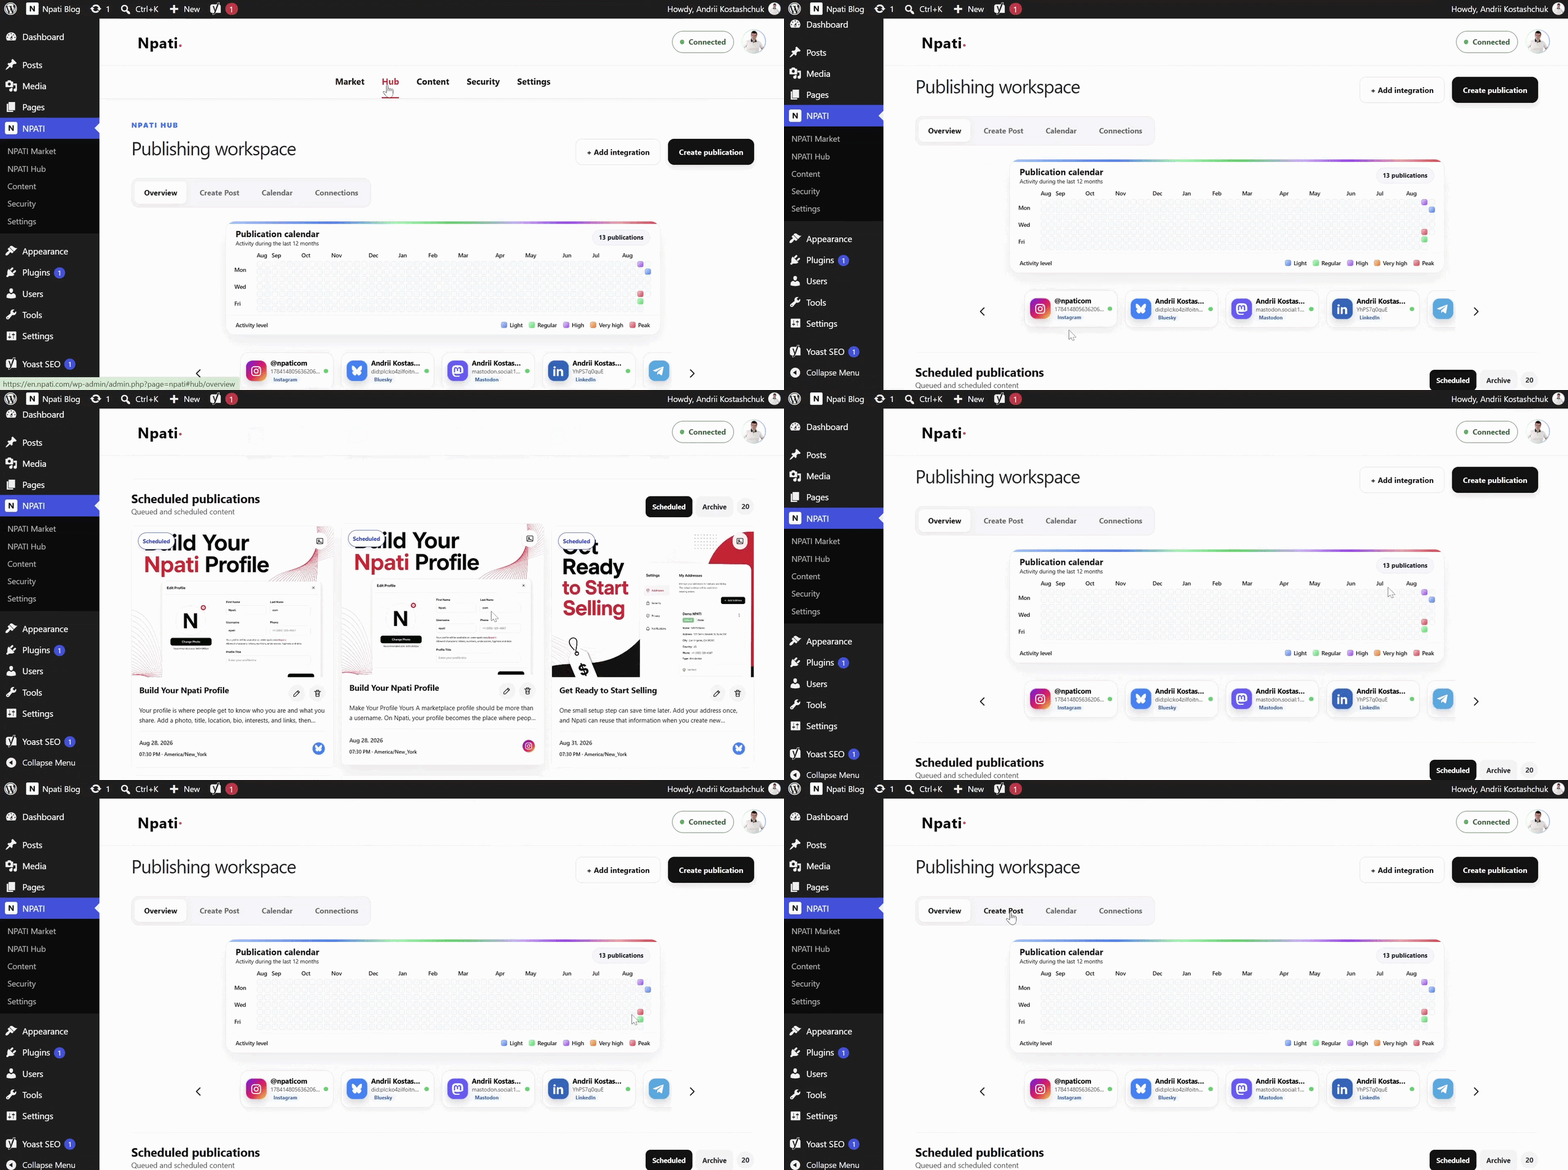
Hub Overview
The Overview page provides a quick summary of your social publishing workspace. It shows scheduled publications, calendar activity and the integrations currently connected to your NPATI Hub account.
The calendar gives you a visual way to understand when content is scheduled and when publications have already taken place. This is especially useful when you manage several channels and want to avoid losing track of your posting plan.
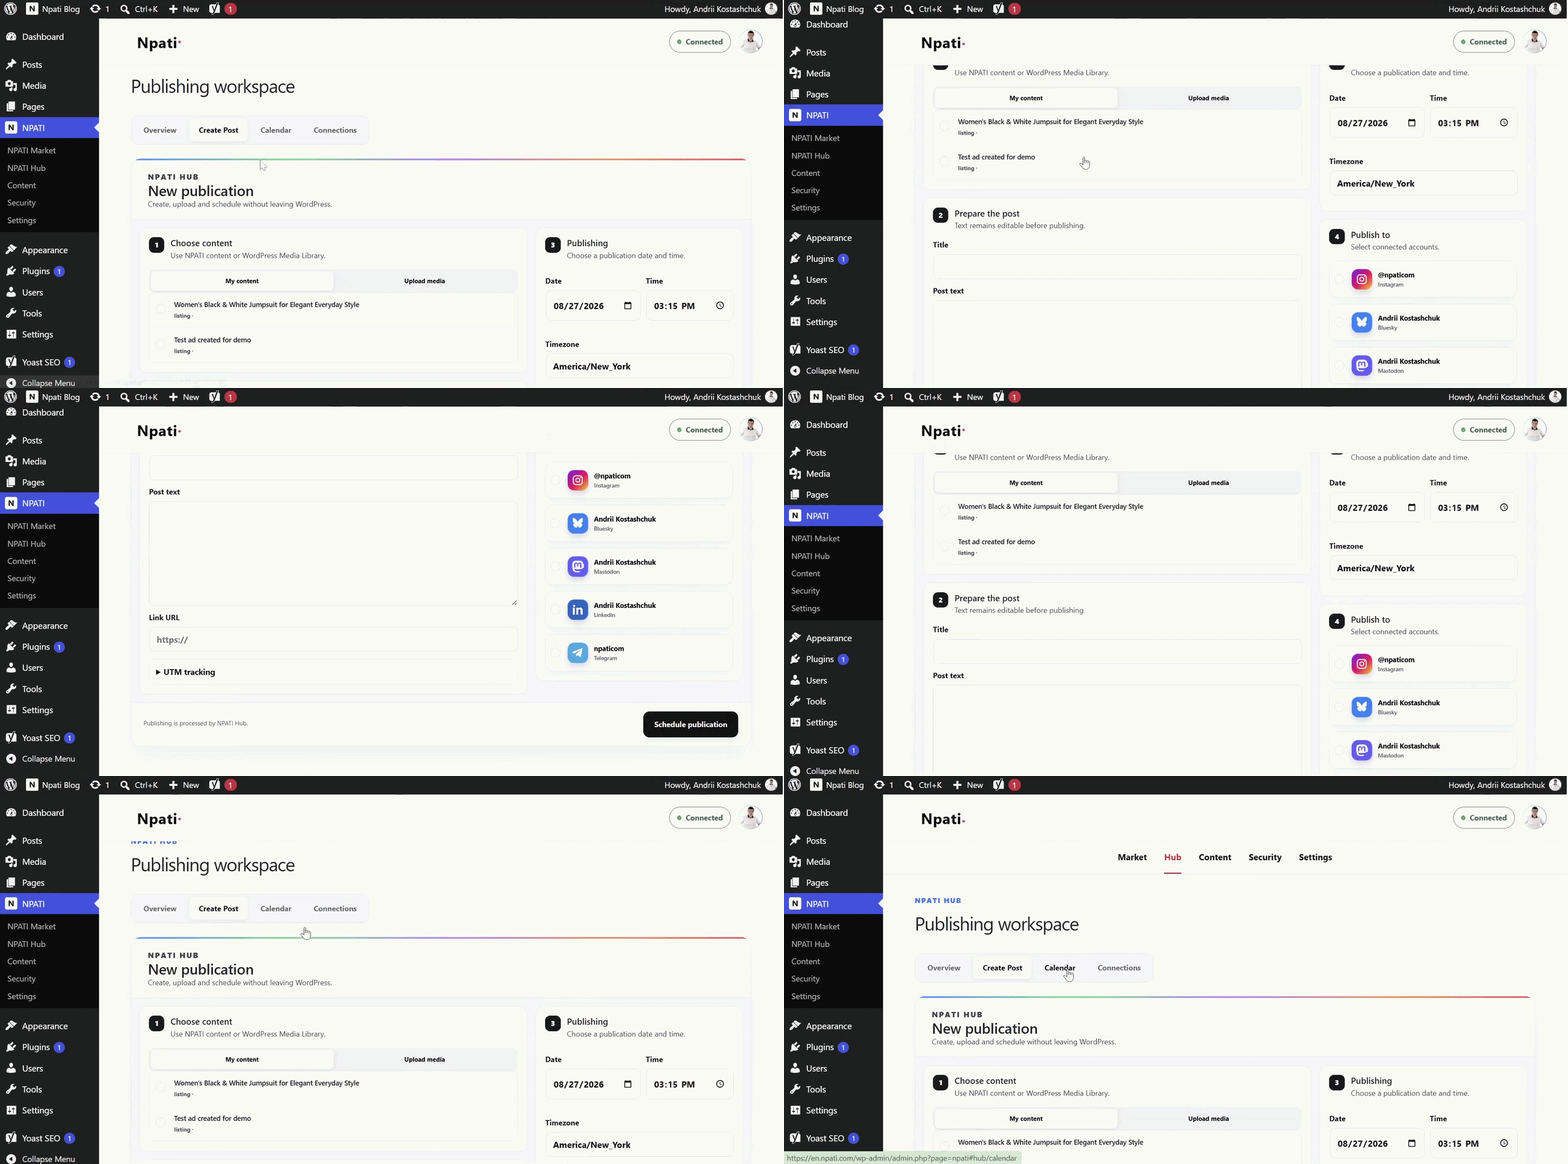
Create Post: Plan Social Content
In Create Post, you can prepare a social publication and schedule it for a future date and time. The available destinations depend on the services you have connected in NPATI Hub.
This workflow is useful for creating a post once, planning its publication and returning later to edit it if your text, media or schedule needs to change.
Calendar and Connections
The Calendar subsection expands the scheduling view so you can see planned and completed social publishing activity across dates. It is useful for content planning, reviewing previous publications and understanding when reposts or scheduled social content are expected to run.
The Connections subsection shows the integrations already connected to your account.
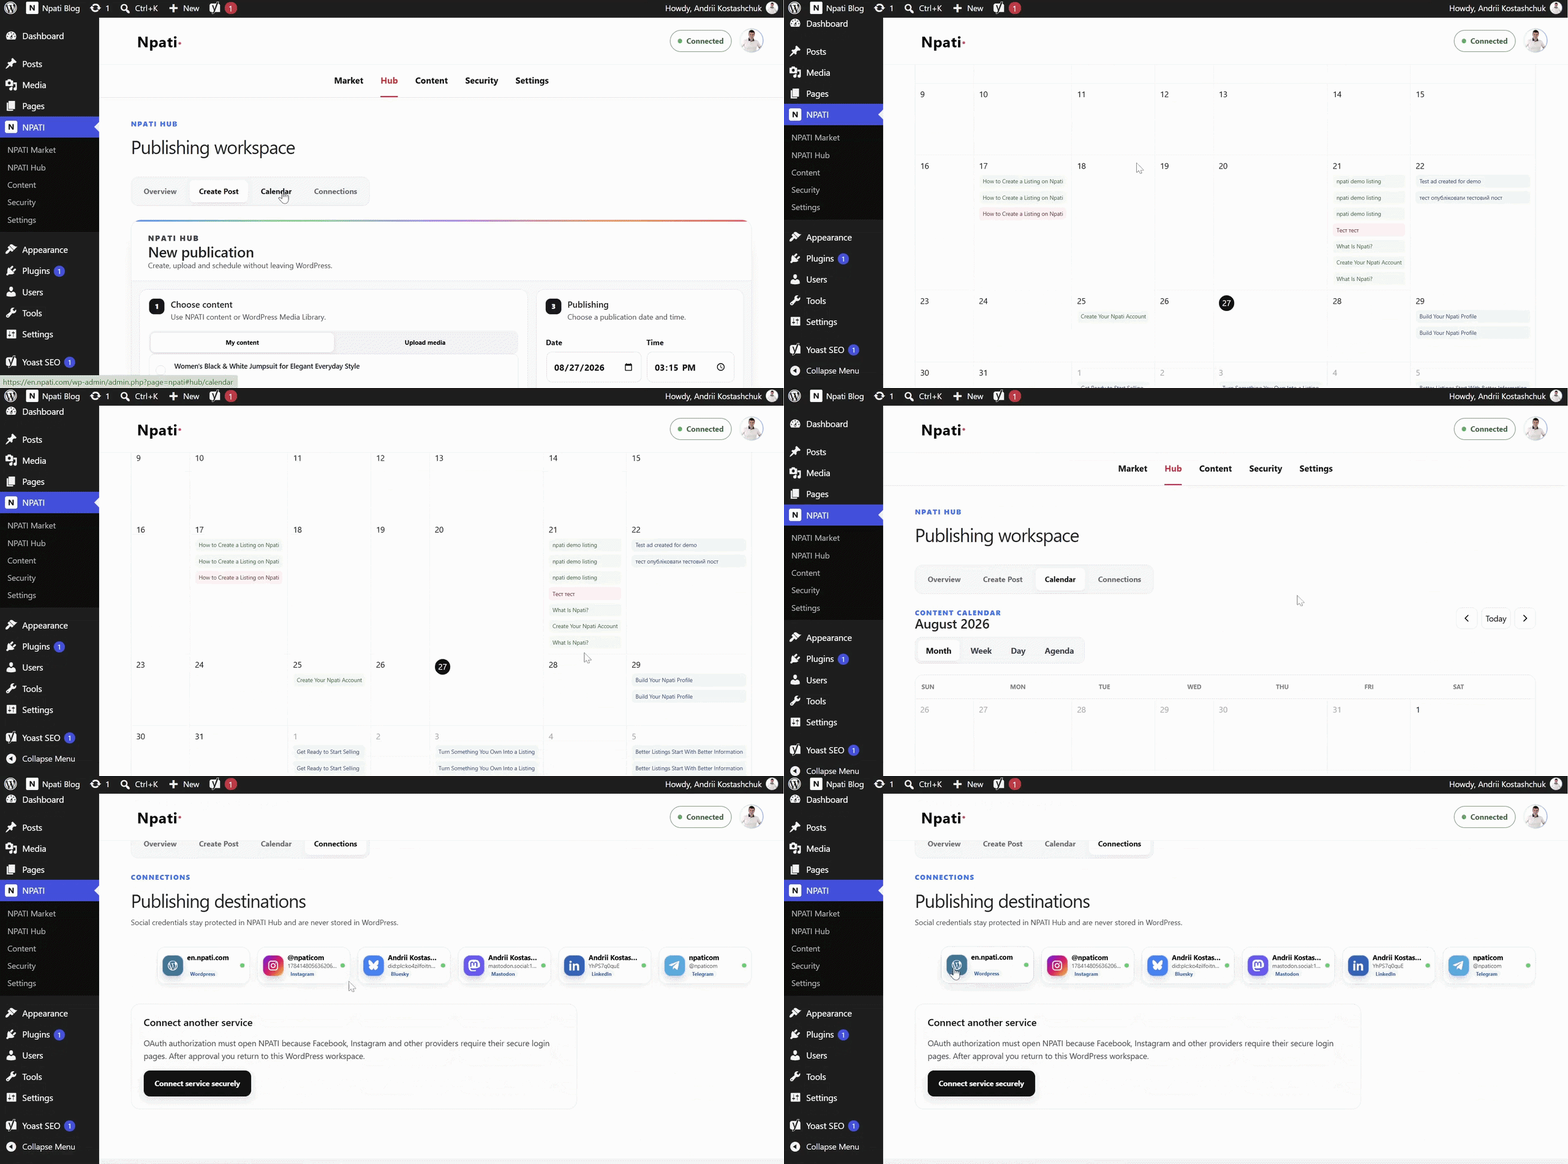
When you want to add another service, the authorization process opens through NPATI Hub. This is important because providers such as Facebook, Instagram and other platforms use their own secure OAuth login and authorization pages. After approval, you return to the WordPress workspace and the connected service becomes available in the plugin.
Why this matters: social account authorization is handled through the provider and NPATI Hub workflow. The WordPress plugin does not need to store social network tokens locally in WordPress.
Content: Plan and Automate WordPress Articles
The Content tab is built for WordPress editorial planning and article automation. You can create publication tasks manually or work with larger batches of planned content.
For an individual article, you can define information such as:
- article title,
- description or content brief,
- keywords,
- category,
- publication date,
- publication time.
If OpenAI is connected, the plugin can use your selected model to help generate article content based on the task information you provide.
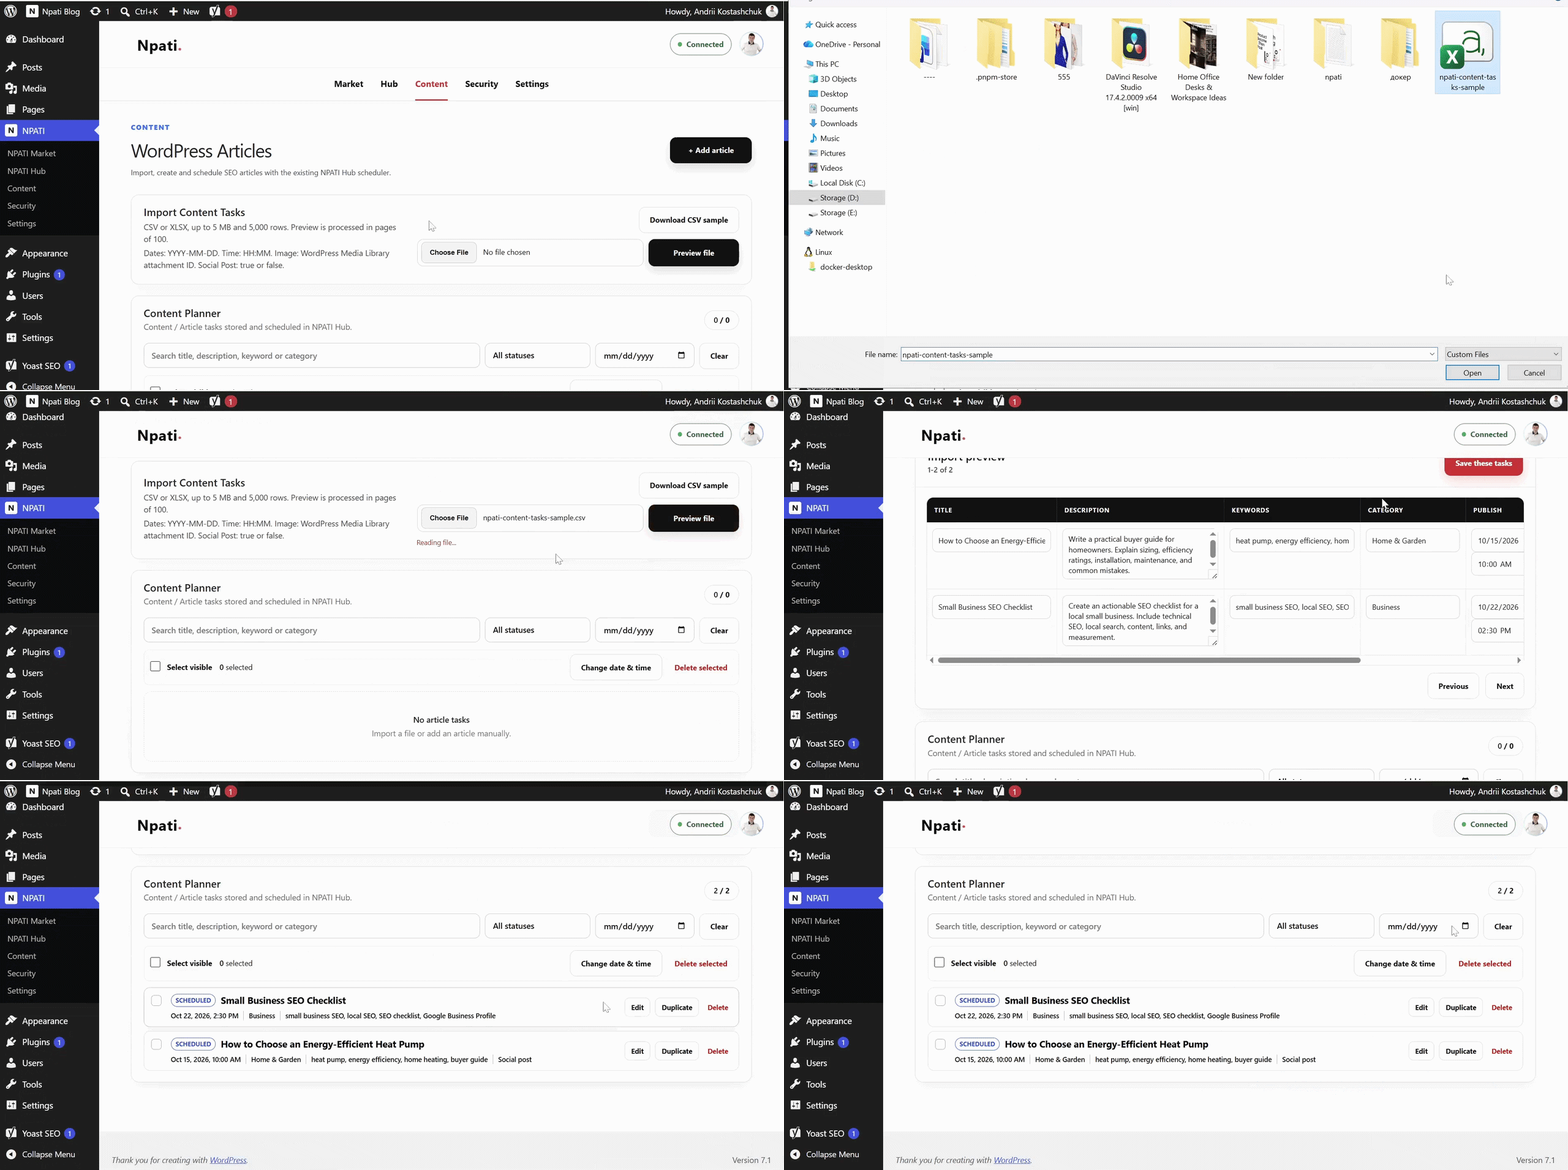
Bulk Content Planning
For larger workflows, you can upload a file containing multiple content tasks and schedule articles across different days. This can be useful for editorial calendars, SEO content plans, documentation series, product guides or other recurring publishing work.
Scheduled items can be managed from the same area. Depending on the task state, you can review, edit, copy, delete or bulk-delete planned articles. Created tasks also appear in the calendar, which makes it easier to understand the overall publishing schedule.
After an article is published, the workflow can also help prepare a shorter version focused on the most important information. That shorter version can then be used as the basis for a social post and scheduled for a suitable date.
OpenAI Is Optional
The marketplace and Hub features do not require an OpenAI API key. OpenAI is needed only when you want to use the plugin’s AI-assisted content-generation functionality.
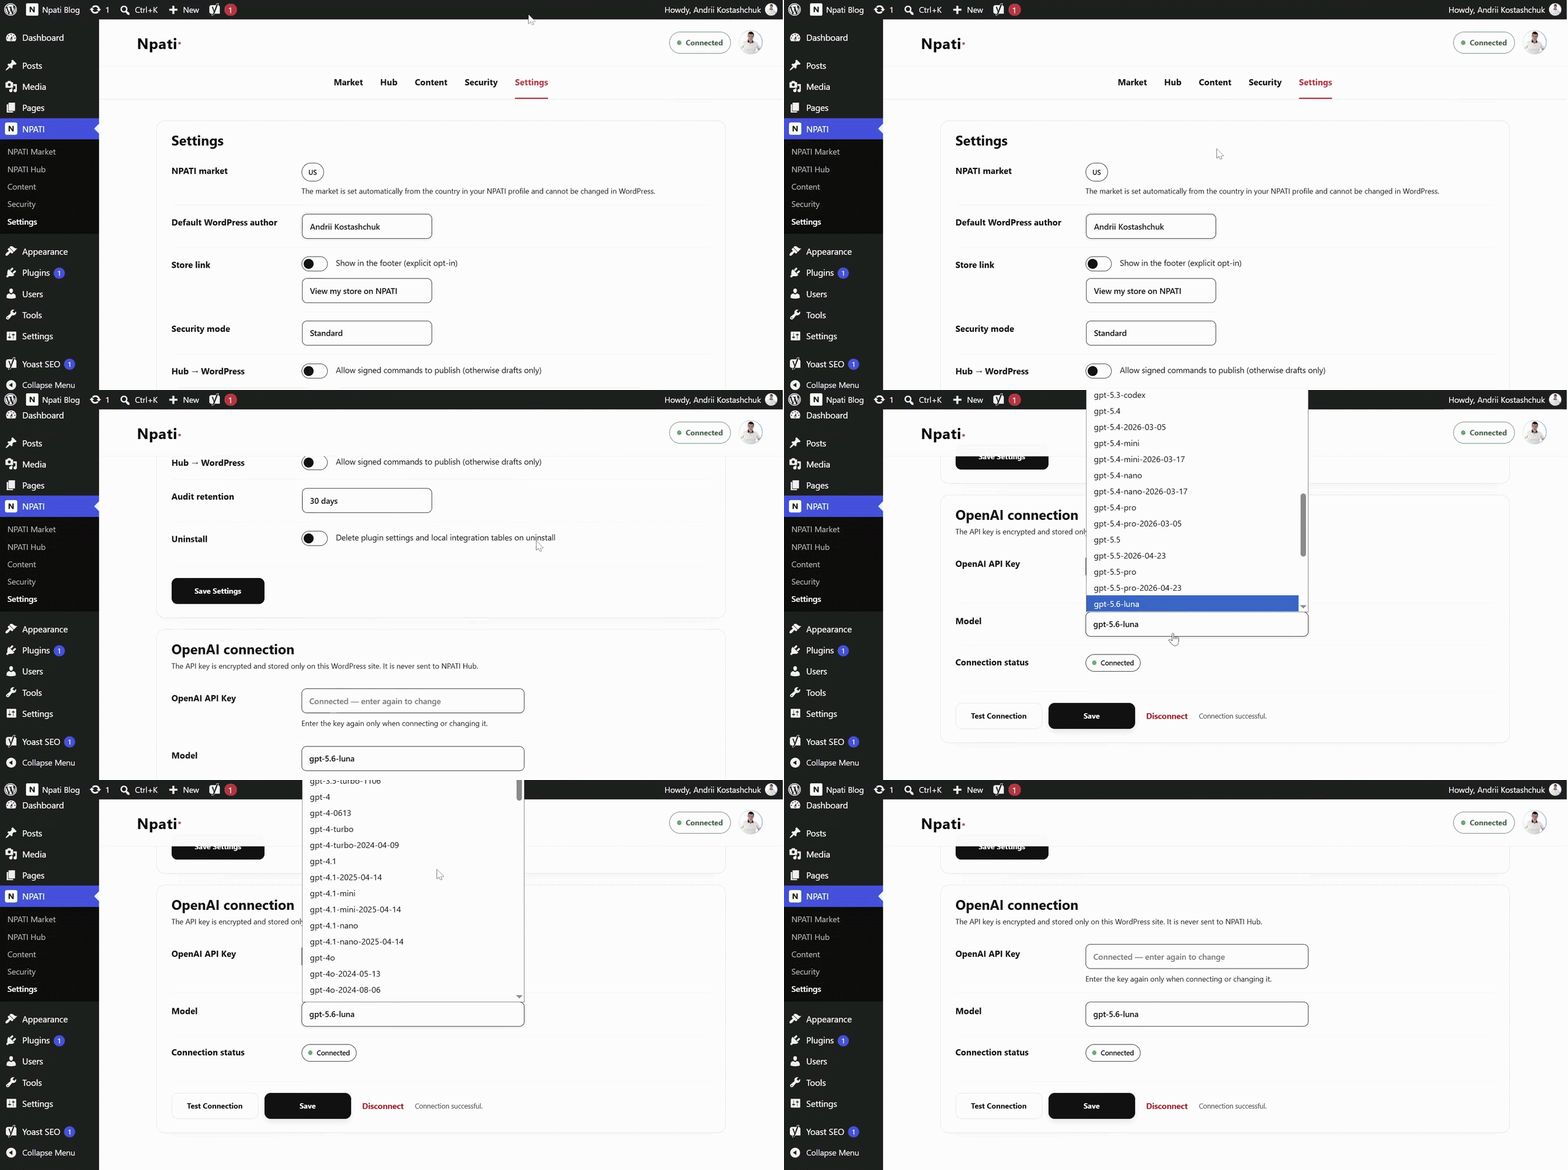
To enable that feature, add your own OpenAI API key and select a model in Settings. The available model list may change as supported OpenAI models evolve.
Cost note: the NPATI Content Automation plugin itself is free. If you use your own OpenAI API key, OpenAI API charges may apply according to your own OpenAI account and usage.
Settings: WordPress, Security and OpenAI Configuration
The Settings page contains the main configuration options for how the plugin behaves on your WordPress website.
General WordPress Settings
Available settings include options such as:
- Default WordPress author, used for content created through the plugin.
- Store link, an explicit opt-in option that can show a link such as View my store on NPATI in the site footer.
- Security mode, including standard operating behavior.
- Hub to WordPress publishing permission, which controls whether signed commands may publish content or whether remote content remains draft-only.
- Audit retention, which controls how long activity records are retained.
- Uninstall cleanup, which can remove plugin settings and local integration tables when the plugin is uninstalled.
OpenAI Connection
The OpenAI connection area allows you to add, test, save or disconnect your API connection. The API key is encrypted and stored on your WordPress site. It is not sent to NPATI Hub.
When a key is already connected, you only need to enter it again when you want to replace or change it. You can also choose the model used for content generation and run a connection test before saving the configuration.
Security: Connection Status and Activity
The Security tab provides a focused view of the plugin’s security and integration status. It can show checks such as:
- HTTPS status,
- Connection status,
- Webhook signature status,
- Social tokens in WordPress, which are not stored locally,
- Recent activity with success or failure information for API requests, connection events and webhooks.
The recent activity log is useful when diagnosing an integration problem because it provides a chronological view of requests and connection events. A failed API request does not automatically mean the whole connection is broken, but repeated failures are a useful signal that the administrator should investigate the integration or remote service.
Who Is NPATI Content Automation For?
WordPress site owners: useful for people who want to manage content planning, publication tasks and connected services without adding multiple disconnected workflows.
Marketplace sellers: useful for sellers who want to create NPATI listings with photos and video while working from WordPress.
Content creators: useful for creators who publish videos, Shorts, blog content and social posts across several channels.
Small businesses and agencies: useful for teams that need a practical calendar for WordPress content and social publishing while keeping marketplace activity connected to the same ecosystem.
Developers and open-source users: the project is available publicly on GitHub, which makes it easier to inspect the code, report issues, contribute improvements or adapt the workflow to your own development process.
What Makes the Plugin Different?
Many WordPress plugins focus on only one task. Some handle social scheduling, others generate AI content, and others connect to external marketplaces. NPATI Content Automation combines several of these workflows in one interface.
- Marketplace integration: create NPATI listings with product information, photos, color labels and video.
- Video and Shorts access: review marketplace video content from WordPress.
- Social Hub integration: work with connected services, scheduled posts and a publishing calendar.
- WordPress content planning: create individual or bulk article tasks and organize them by date.
- Optional AI assistance: use your own OpenAI API key only when AI-generated content is needed.
- Security-oriented defaults: publishing permissions, signed commands, activity logging and local control over the OpenAI key are part of the workflow.
- Open-source availability: the source code is published on GitHub.
The result is a plugin that acts less like a single-purpose WordPress add-on and more like a control panel connecting WordPress, NPATI marketplace features, NPATI Hub and optional AI content generation.
Free and Open Source
NPATI Content Automation is free. There is no plugin subscription required to install and use the plugin itself.
The only potential AI-related cost comes from OpenAI when you choose to connect and use your own OpenAI API key. Those charges are handled by OpenAI according to your account and API usage, not as a plugin subscription.
You can install the official WordPress plugin from WordPress.org, view the source code on GitHub, or read more on the official NPATI Content Automation plugin page.
Useful NPATI Resources
- NPATI marketplace and video platform
- NPATI Hub for social integrations and publishing
- NPATI Content Automation plugin page
- NPATI plugins directory
- NPATI Content Automation on WordPress.org
- NPATI Content Automation source code on GitHub
- NPATI Blog
- How to Create a Listing on NPATI
- NPATI Content Automation for WordPress: Manage Listings
Frequently Asked Questions
Is NPATI Content Automation free?
Yes. The WordPress plugin itself is free to install and use.
Do I need an OpenAI API key?
No. OpenAI is optional. You need an API key only if you want to use AI-assisted article generation features.
Where is my OpenAI API key stored?
The plugin stores the key encrypted on your WordPress site. It is not sent to NPATI Hub.
Can I create NPATI marketplace listings from WordPress?
Yes. The Market section is designed to let you create marketplace listings, add product photos, label images by color, add video and set pricing from the WordPress plugin interface.
Can I schedule social posts?
Yes. Through NPATI Hub and connected social integrations, you can create and schedule supported social publications and review them in the calendar.
Can I plan multiple WordPress articles?
Yes. The Content section supports individual content tasks as well as bulk planning workflows where multiple articles can be prepared for different publication dates.
Is the source code public?
Yes. The project is available on GitHub at github.com/andrii-koss/npati-content-automation.
Final Thoughts
NPATI Content Automation brings several everyday publishing workflows together inside WordPress. Marketplace listings, product photos, video, social connections, scheduling, content planning and optional AI-assisted writing can all be managed from a connected workspace instead of being treated as completely separate processes.
For sellers, creators and WordPress administrators already using NPATI, the plugin can reduce repetitive work and provide a clearer overview of what is being created, scheduled and published. For developers, the open-source repository provides a transparent starting point for reviewing the implementation and following future development.
To get started, install NPATI Content Automation from WordPress.org, connect your NPATI account and enable only the integrations and optional AI features that you need.